Early gardening

My rhubarb is once again growing amazingly large. This plant has a long history. I first met it in the back yard of the house I grew up in. When it was there it benefited from annual feeding in the form of manure from an abandoned stable on our cottage property. When I eventually bought my own house in Waterloo, I dug up a football-sized hunk of the root and planted at my new house, where it continued to thrive. Three years ago, when we moved to New Dundee, I dug up a bunch of pieces of the root and replanted them in New Dundee, and as you can see in the photo they continue to thrive despite having grown in three rather different soil types.

Lily and the rhubarb

Watch out, Lily! It’s going to eat you!

In front of Lily in the photo is my mulberry plant. The main trunk is now about 1′ tall since I cut half of it off this spring. By then the buds were already opening, and this plant has seemed so vigourous that I just planted the cut-off part in the ground and plan to keep it well-watered and pruned during the summer. This was done a couple of weeks ago and the new foliage, although a bit smaller than on the parent plant, is still growing. Time will tell whether it will survive but I think if it lasts the year it should be fine.

New mulberry plant

This is the piece cut off the trunk of my original plant, rather crudely planted. We’ve had plenty of rain lately and so far, so good.

Pump Latch Mechanism R&R

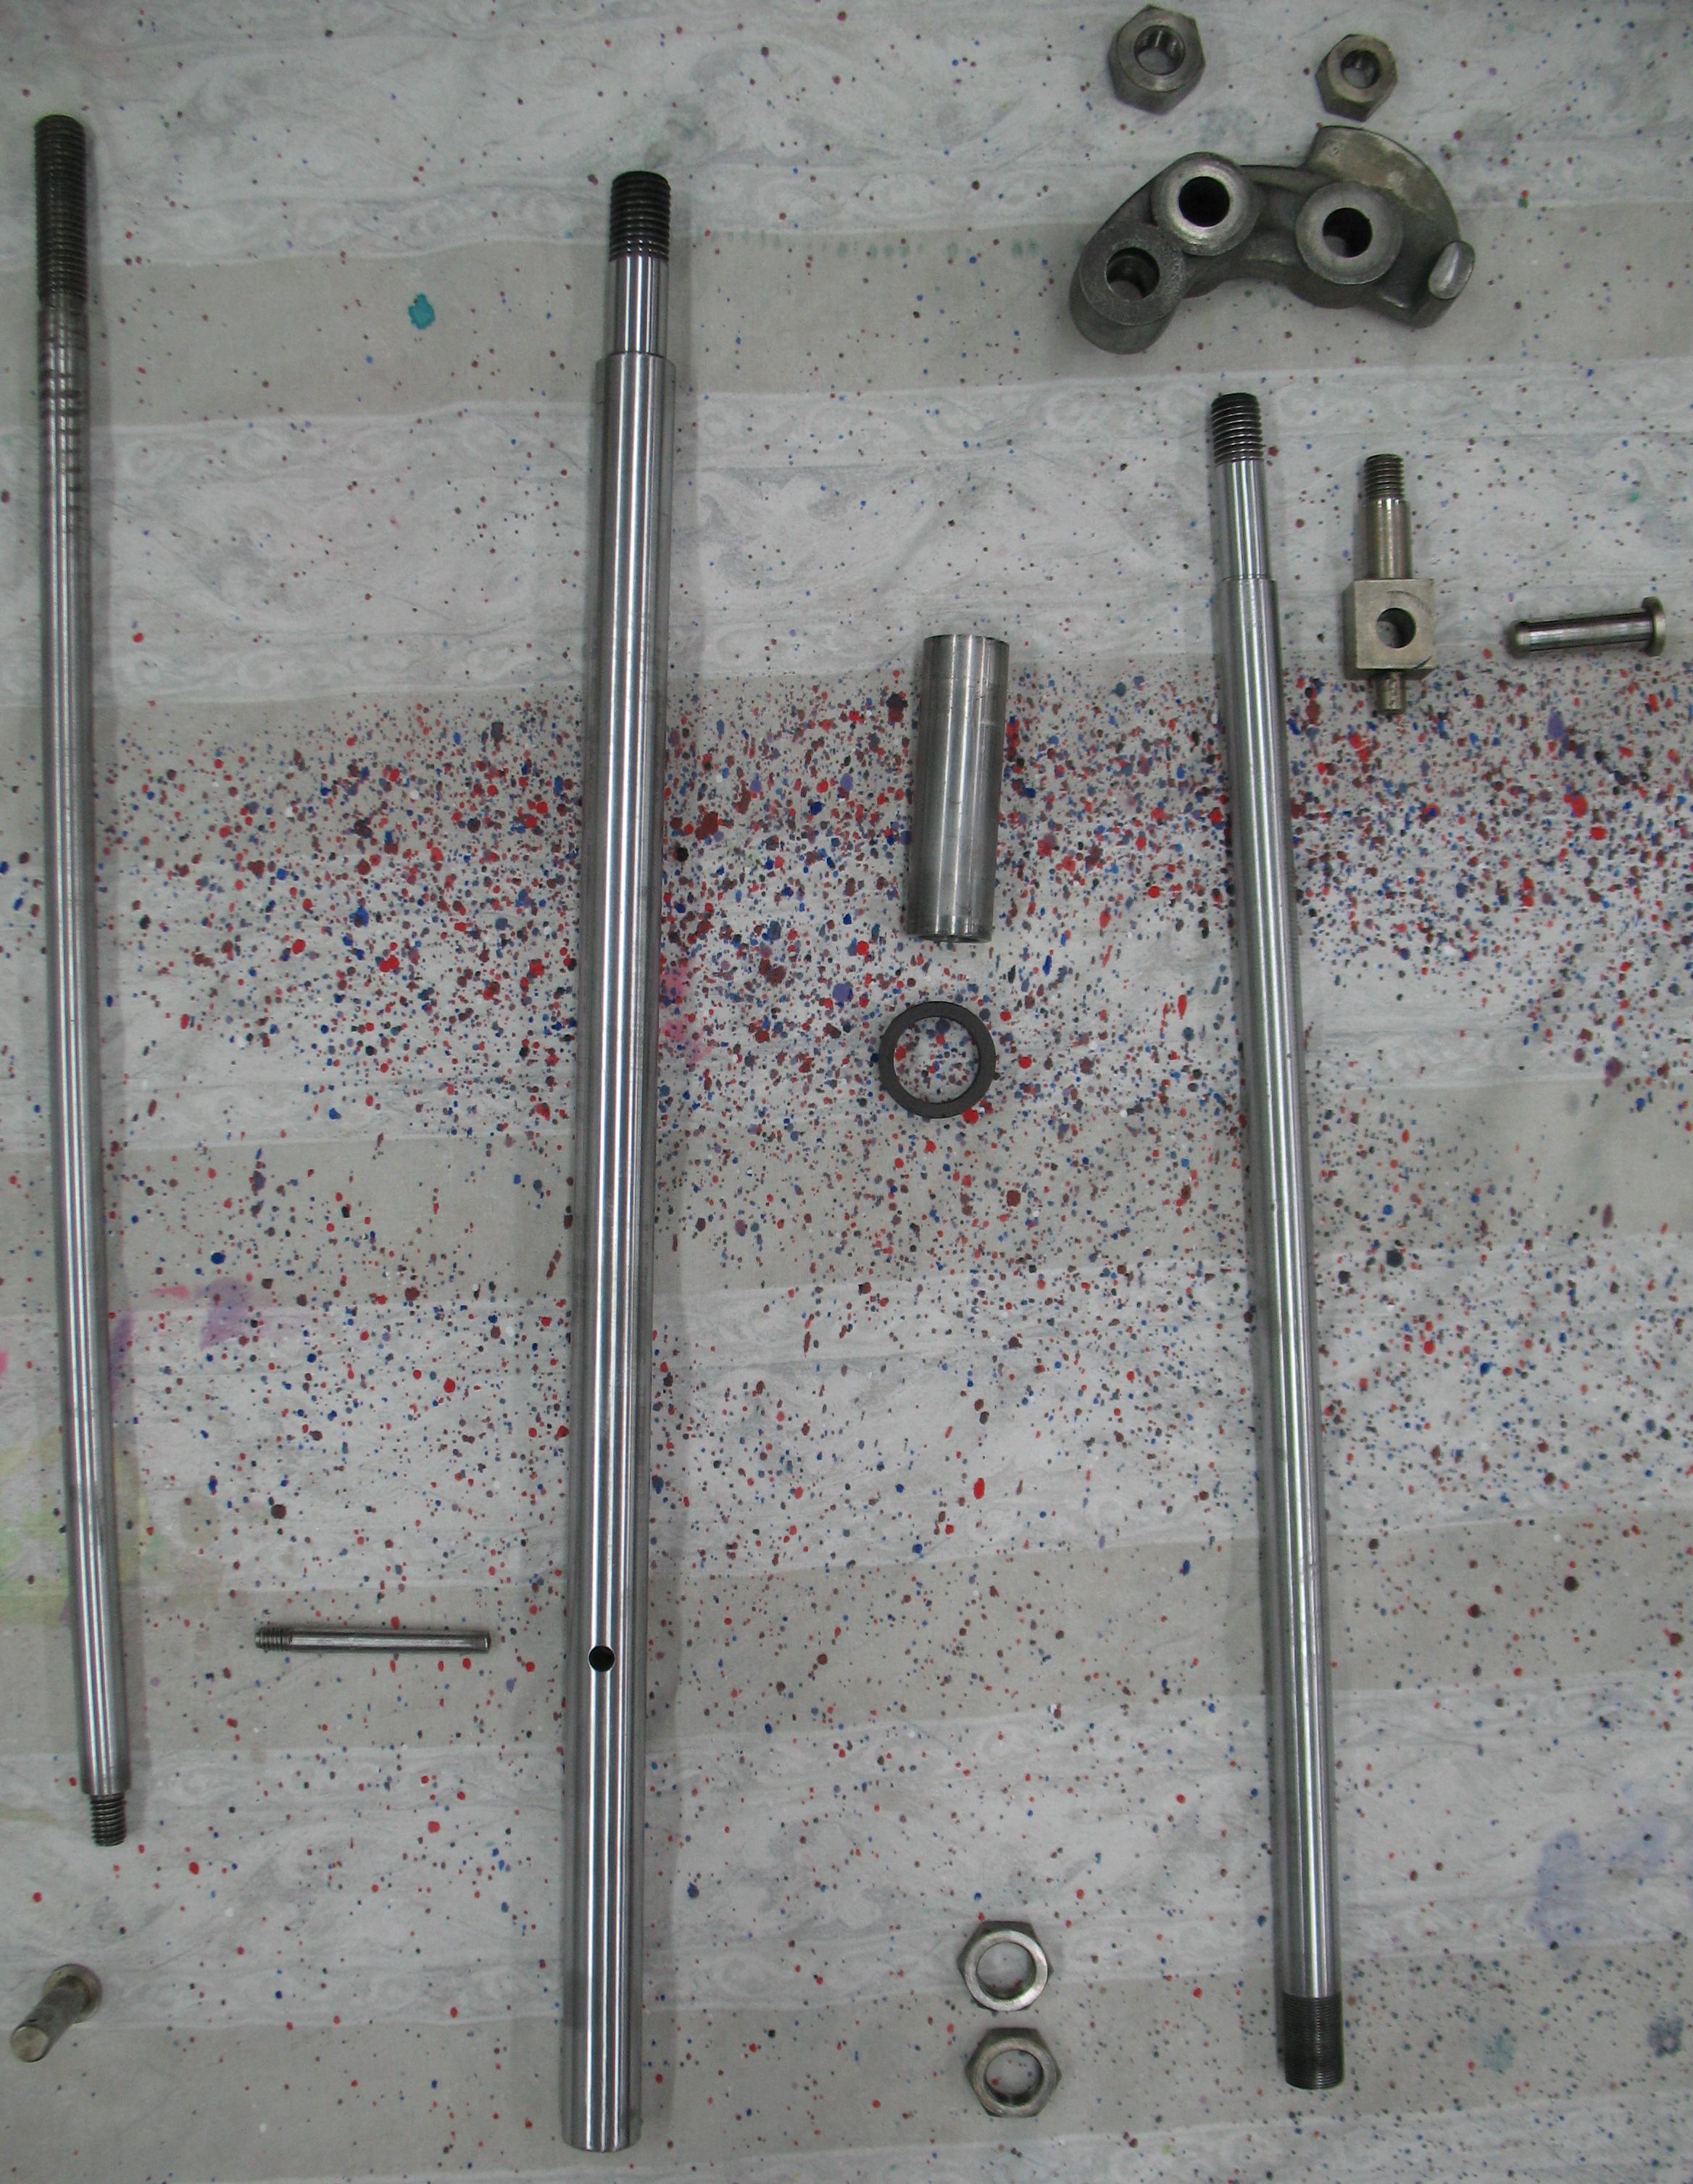
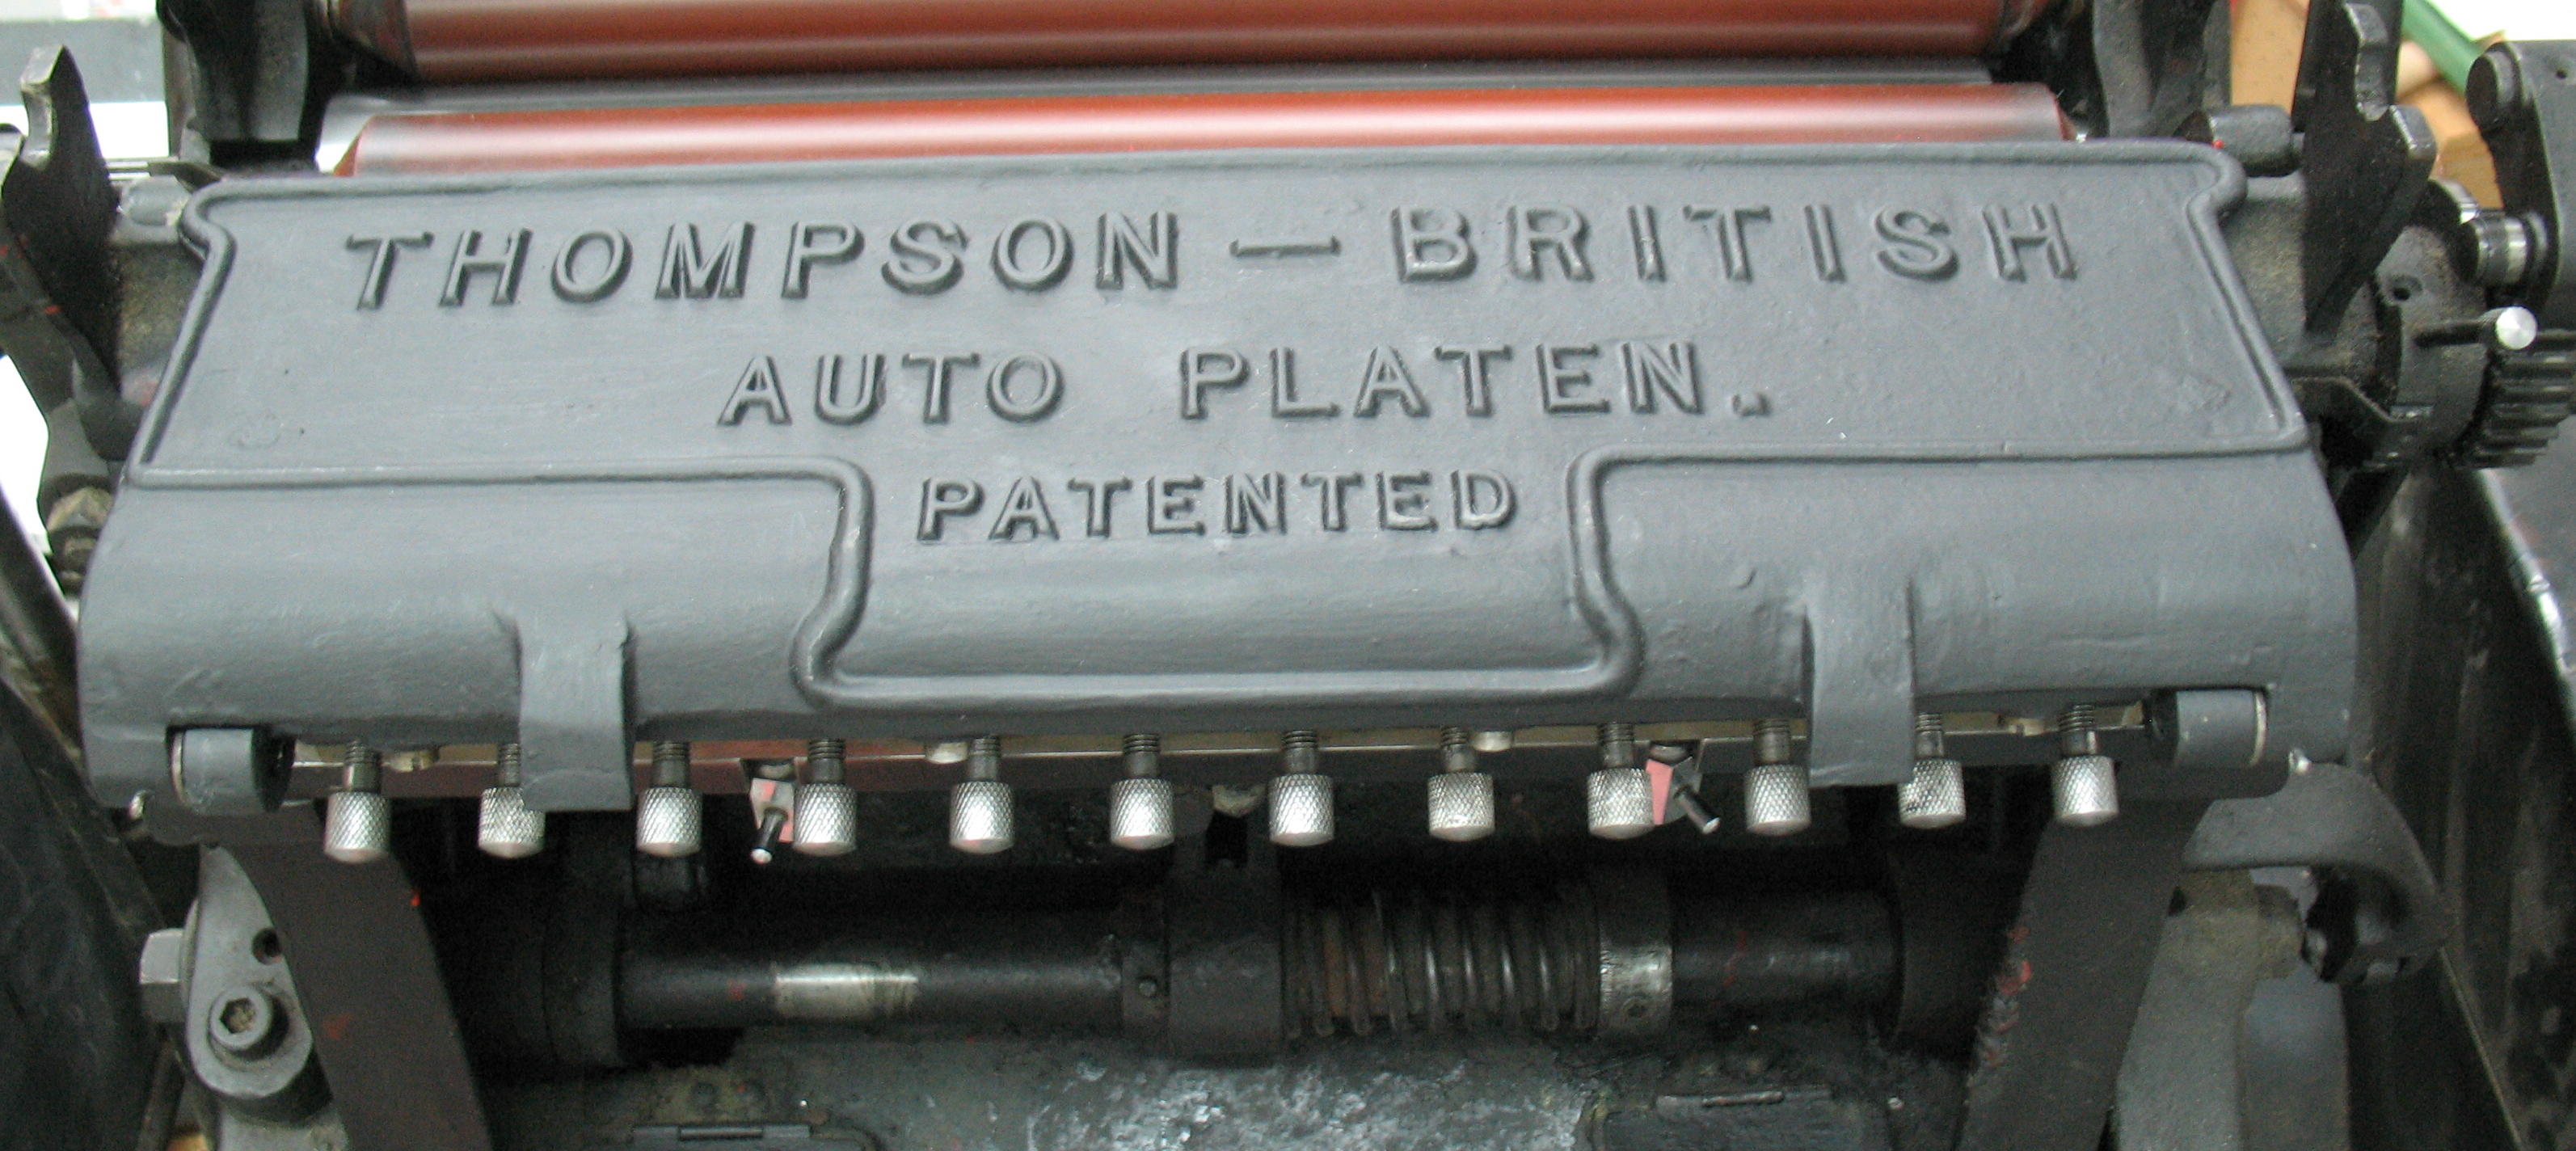
Although most of my work on the pump on my Monotype caster seems to be on making a new extended-stroke piston rod, I am also working on cleaning and refurbishing the pump latch mechanism that Rich Hopkins sent me.

After disassembling and cleaning the parts I found that there were two broken-off screw stubs in one of the parts. The shape of the part and small size of the screws made removal of the broken stubs almost impossible. Even trying to drill them out failed because the drill bit would wander off the broken screw into the comparatively soft cast iron part it was embedded in.

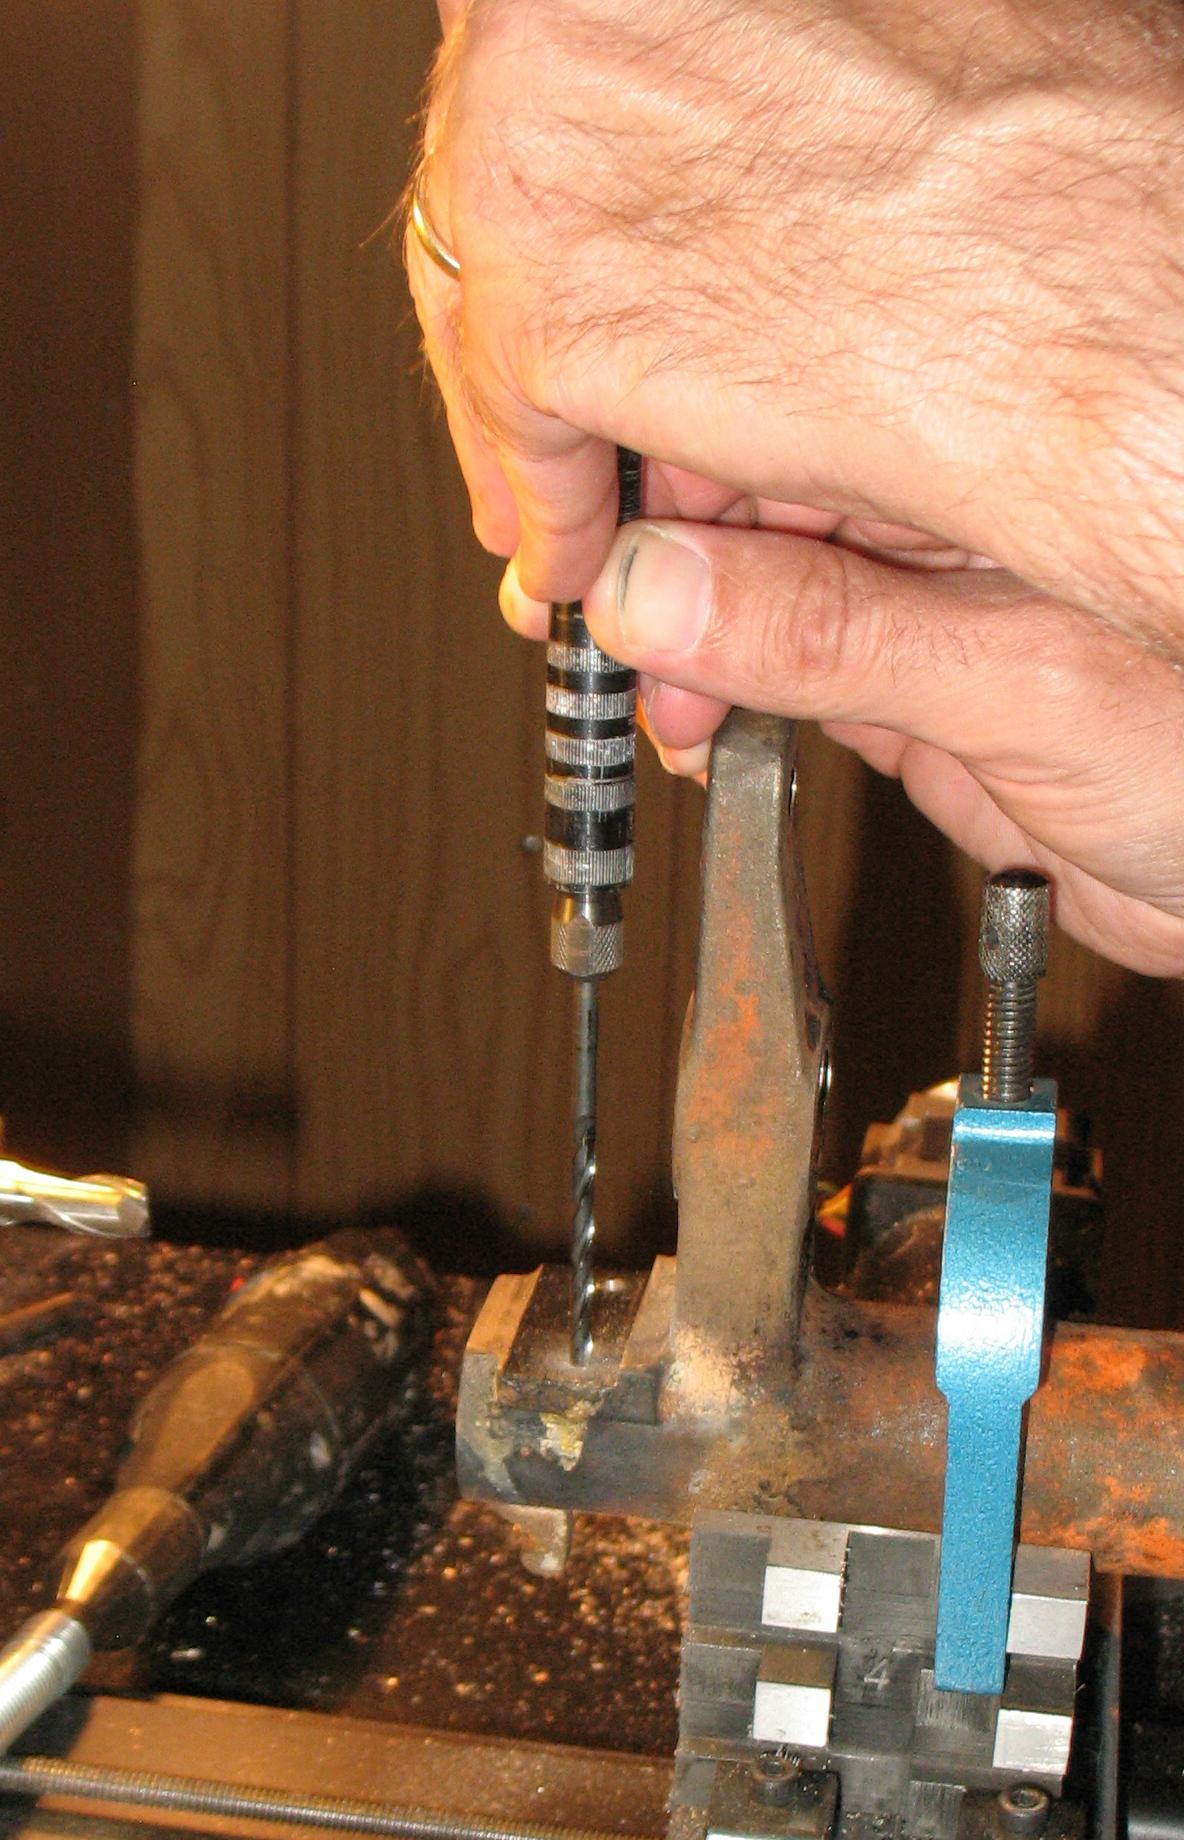
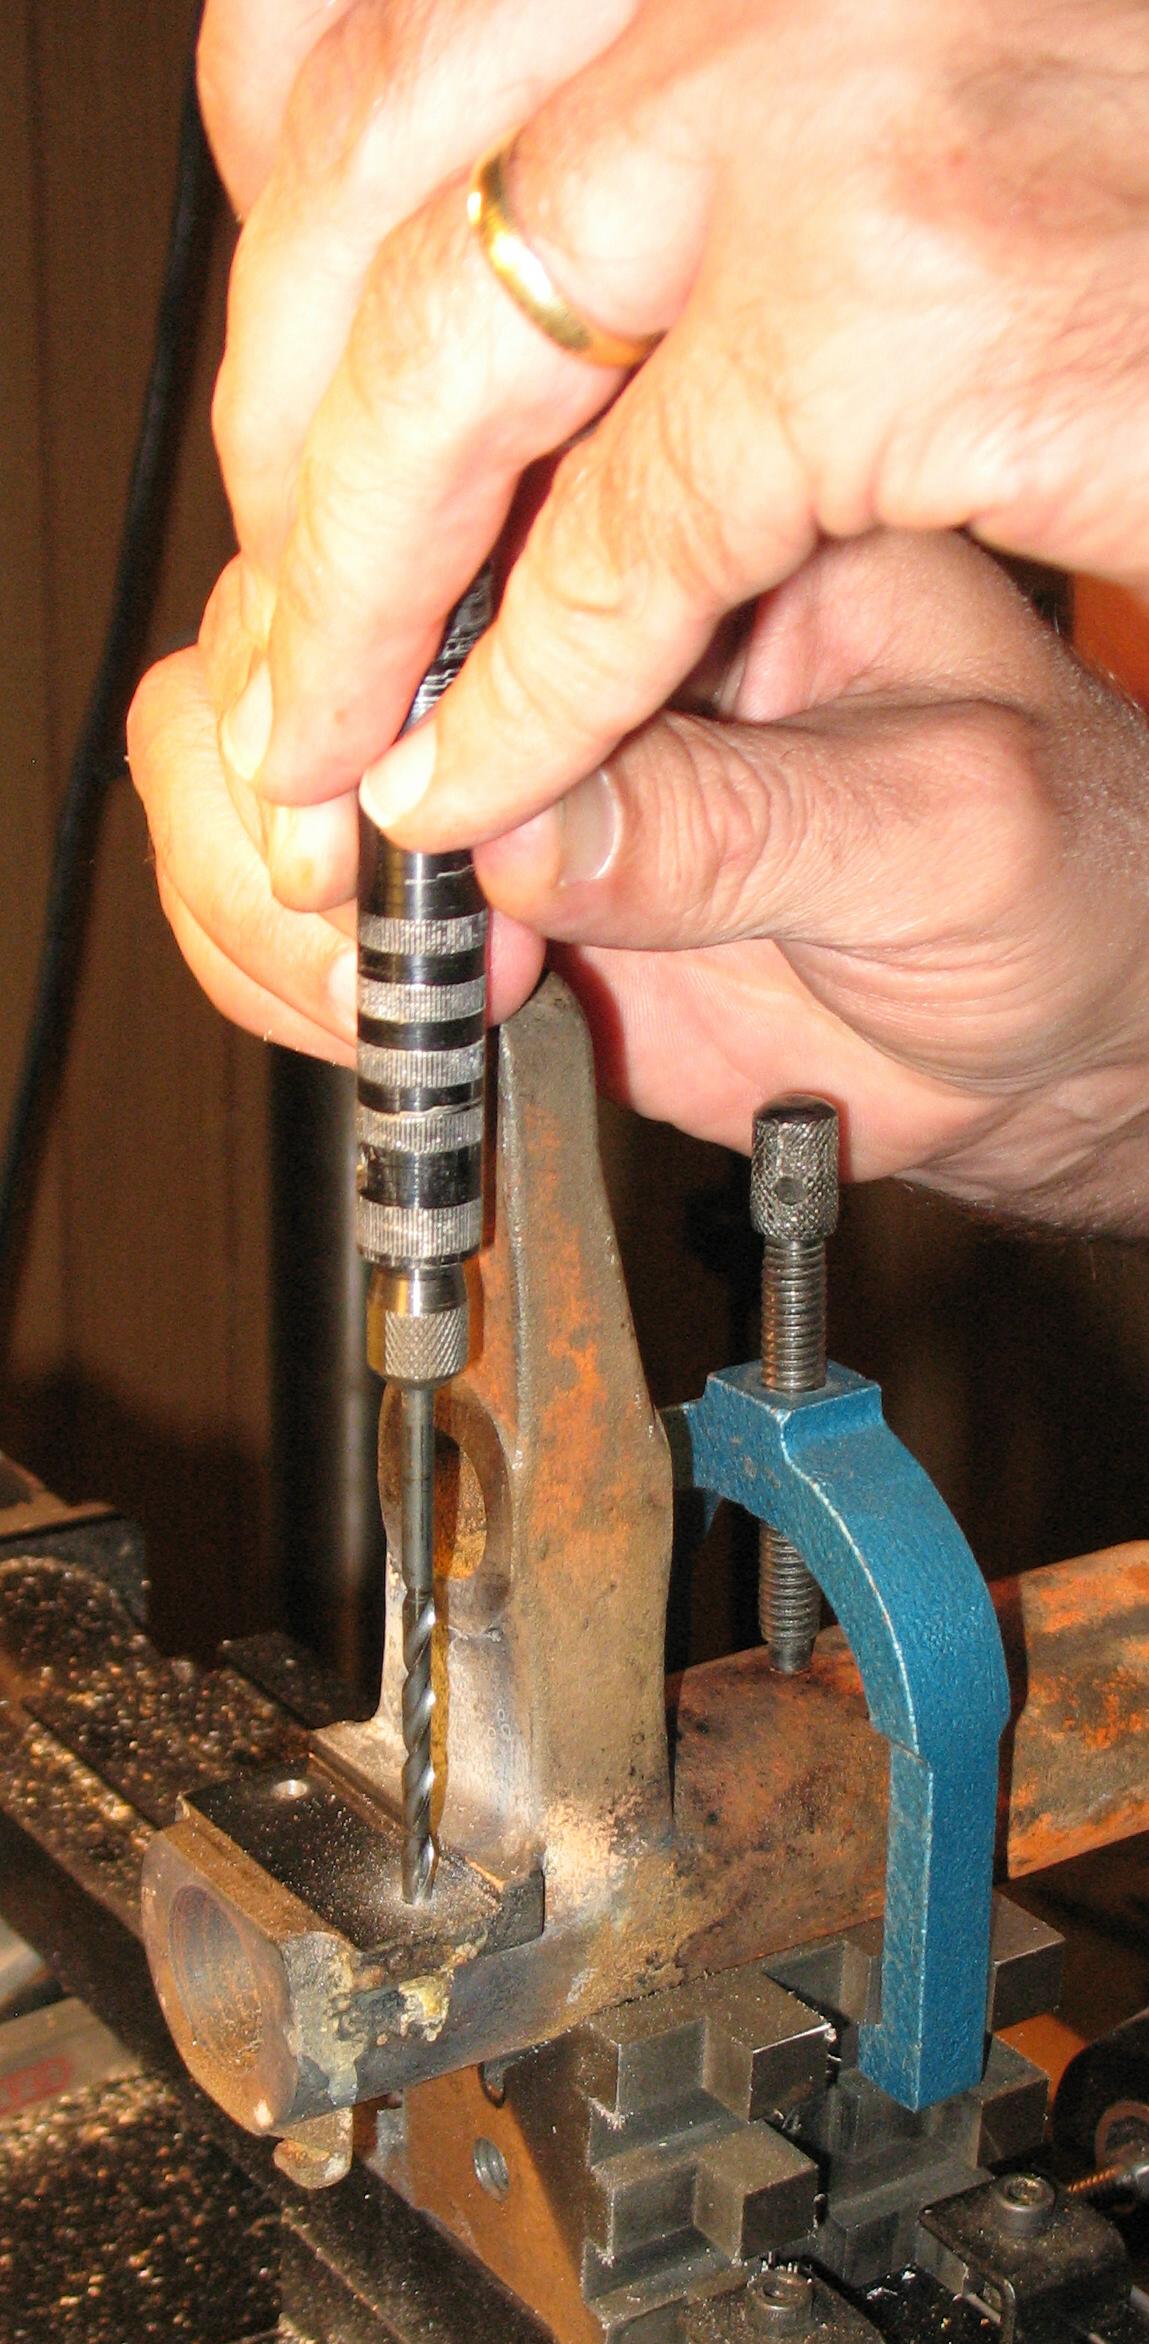
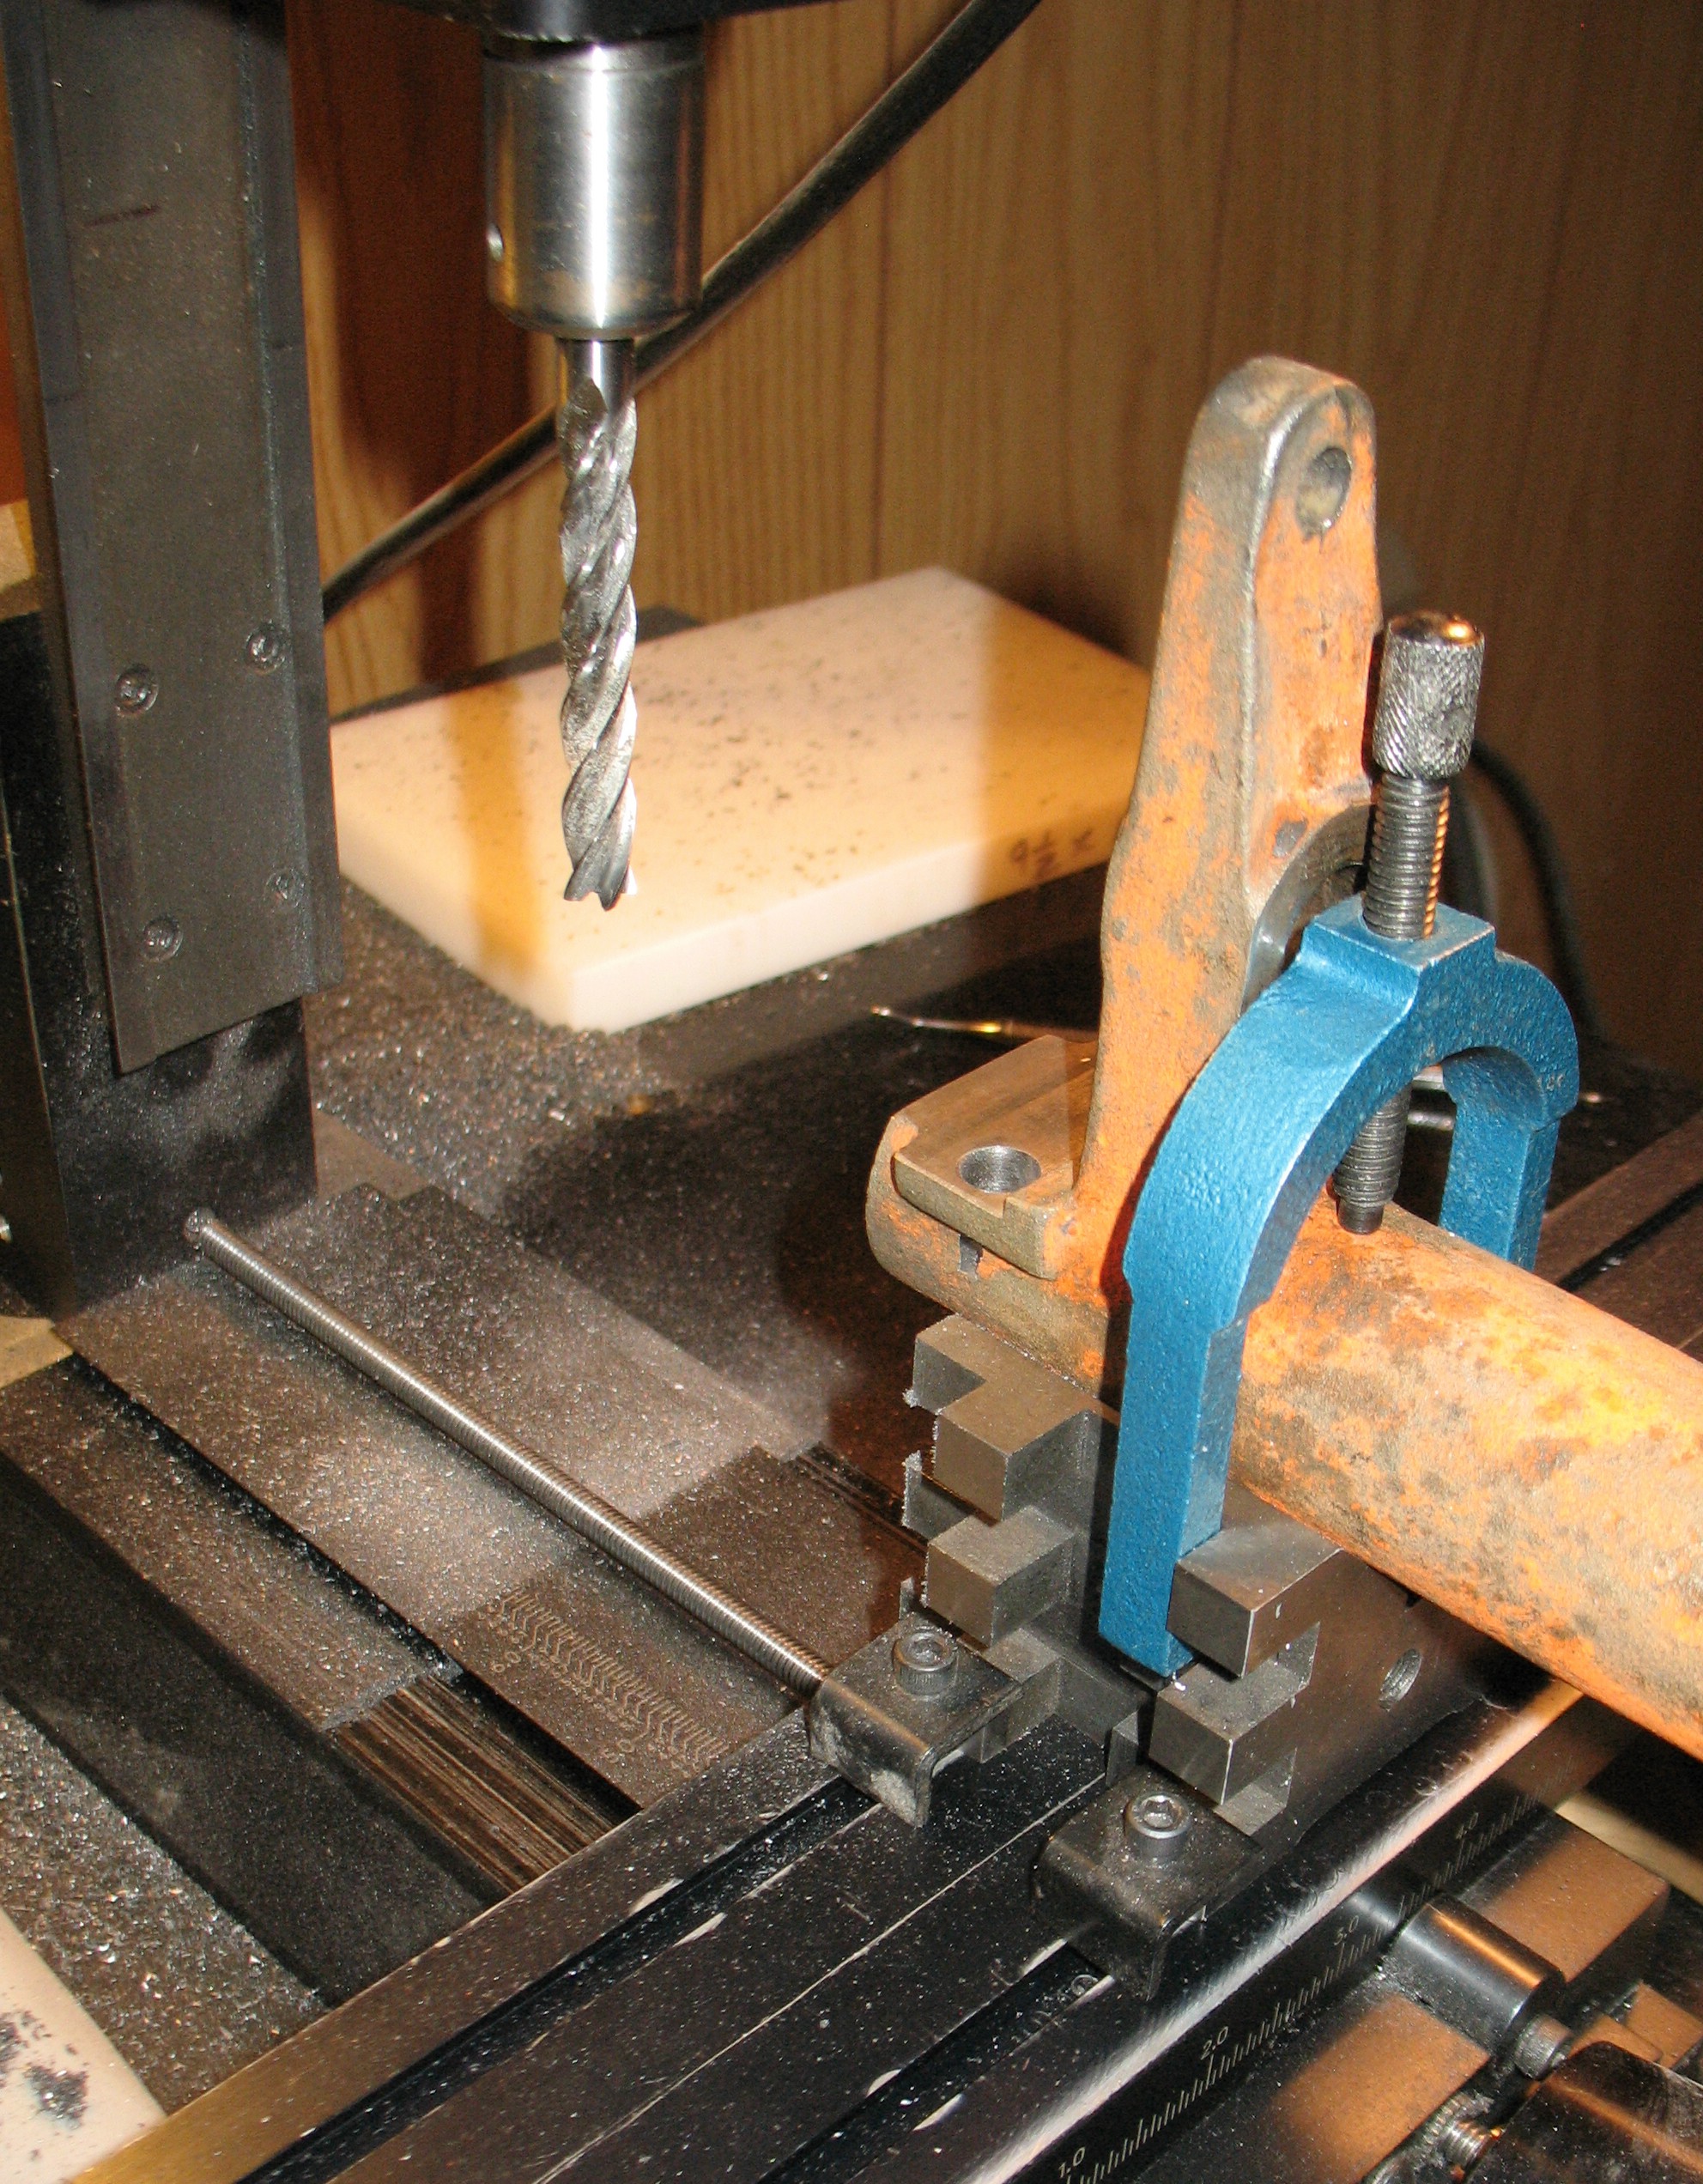
I eventually found that I could use a 4″ long endmill to reach the screws and mill them out. Unlike a drill, an endmill has a flat face and does not tend to drift so much from hardness variations. Unfortunately the mill was also 3/8″ diameter and so left large holes to be filled.

Latch part

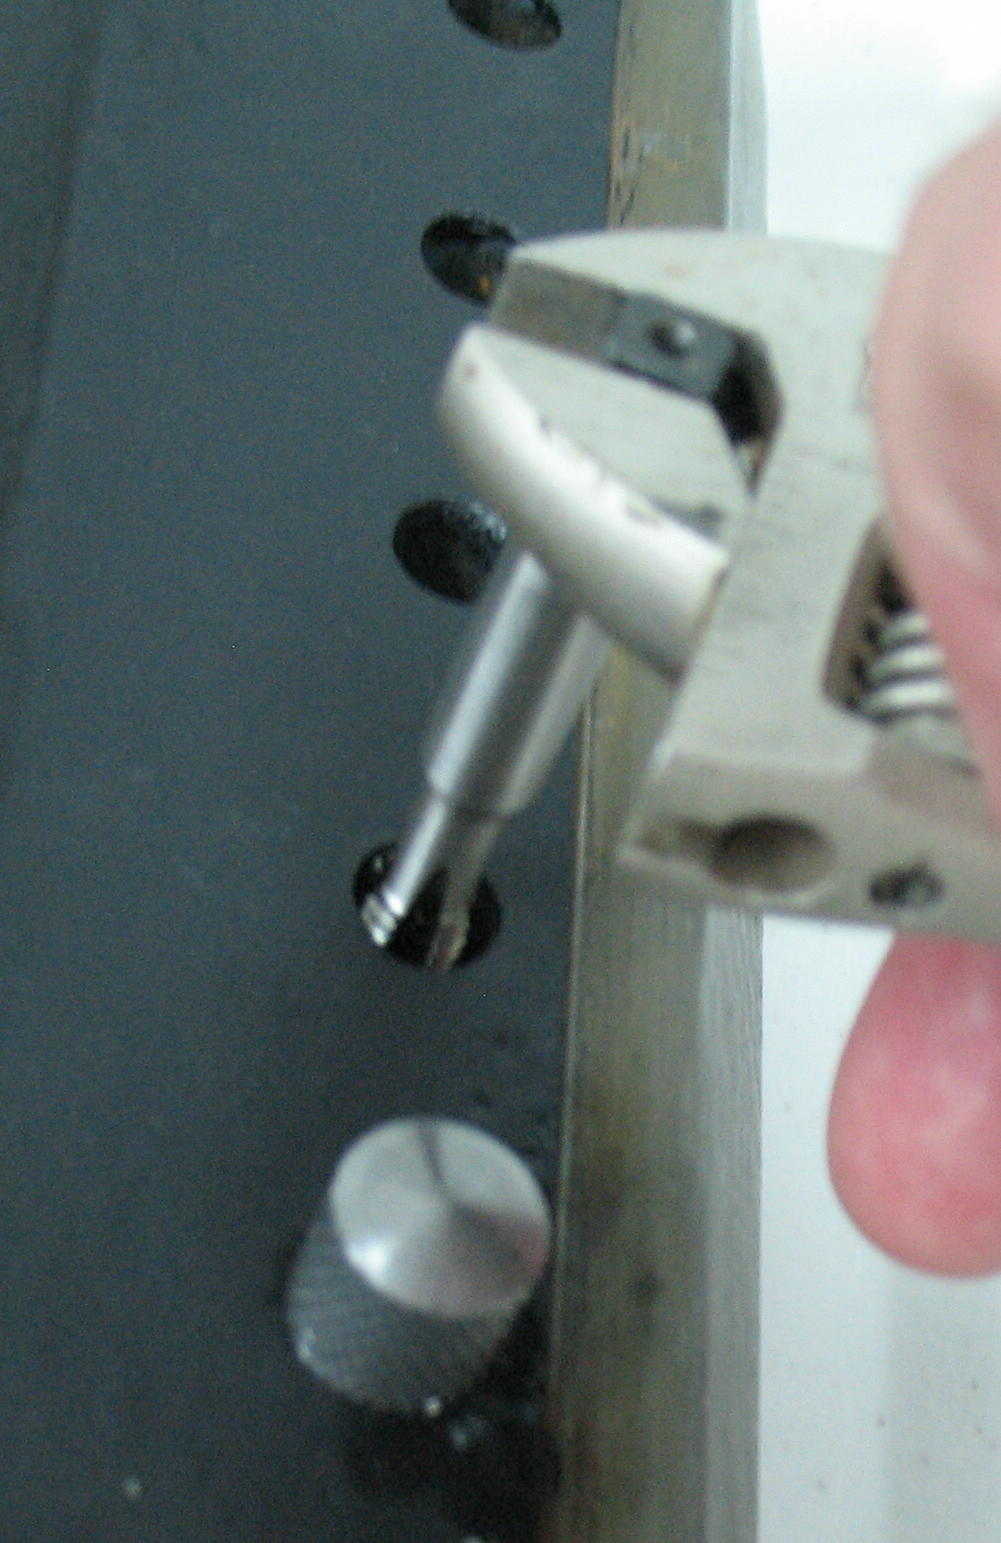
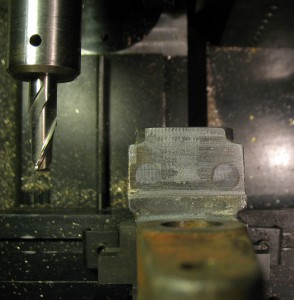
This is the latch part with the broken screws milled out. Note the arm close to the holes which requires long-reach tools.

Latch part

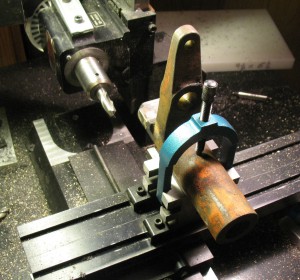
This was the milling setup for removing the broken screws. Note the extra-long endmill which was able to reach the required location.

I made some steel plugs the required diameter to fill the holes and brazed them in place, milled off the excess metal and finally finished the surface with a file.

Plugs

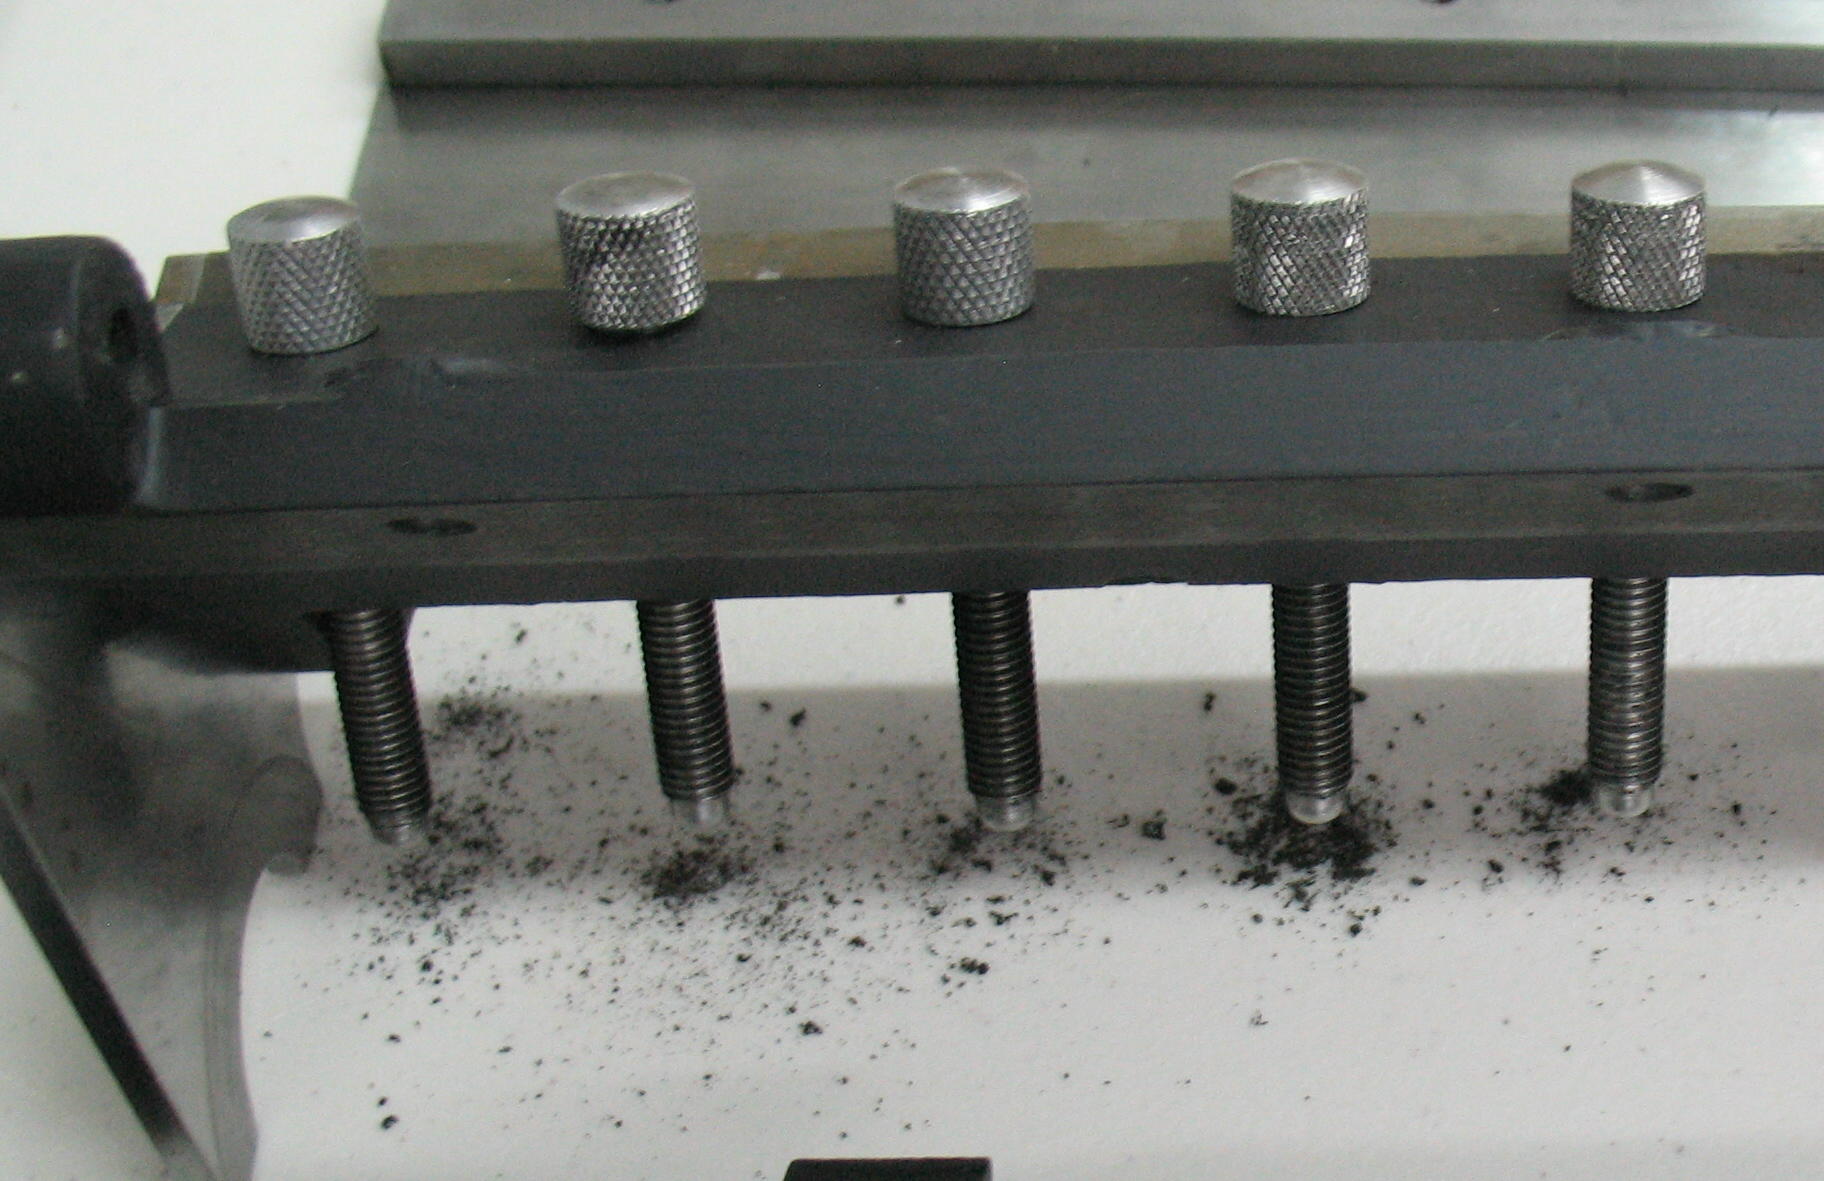
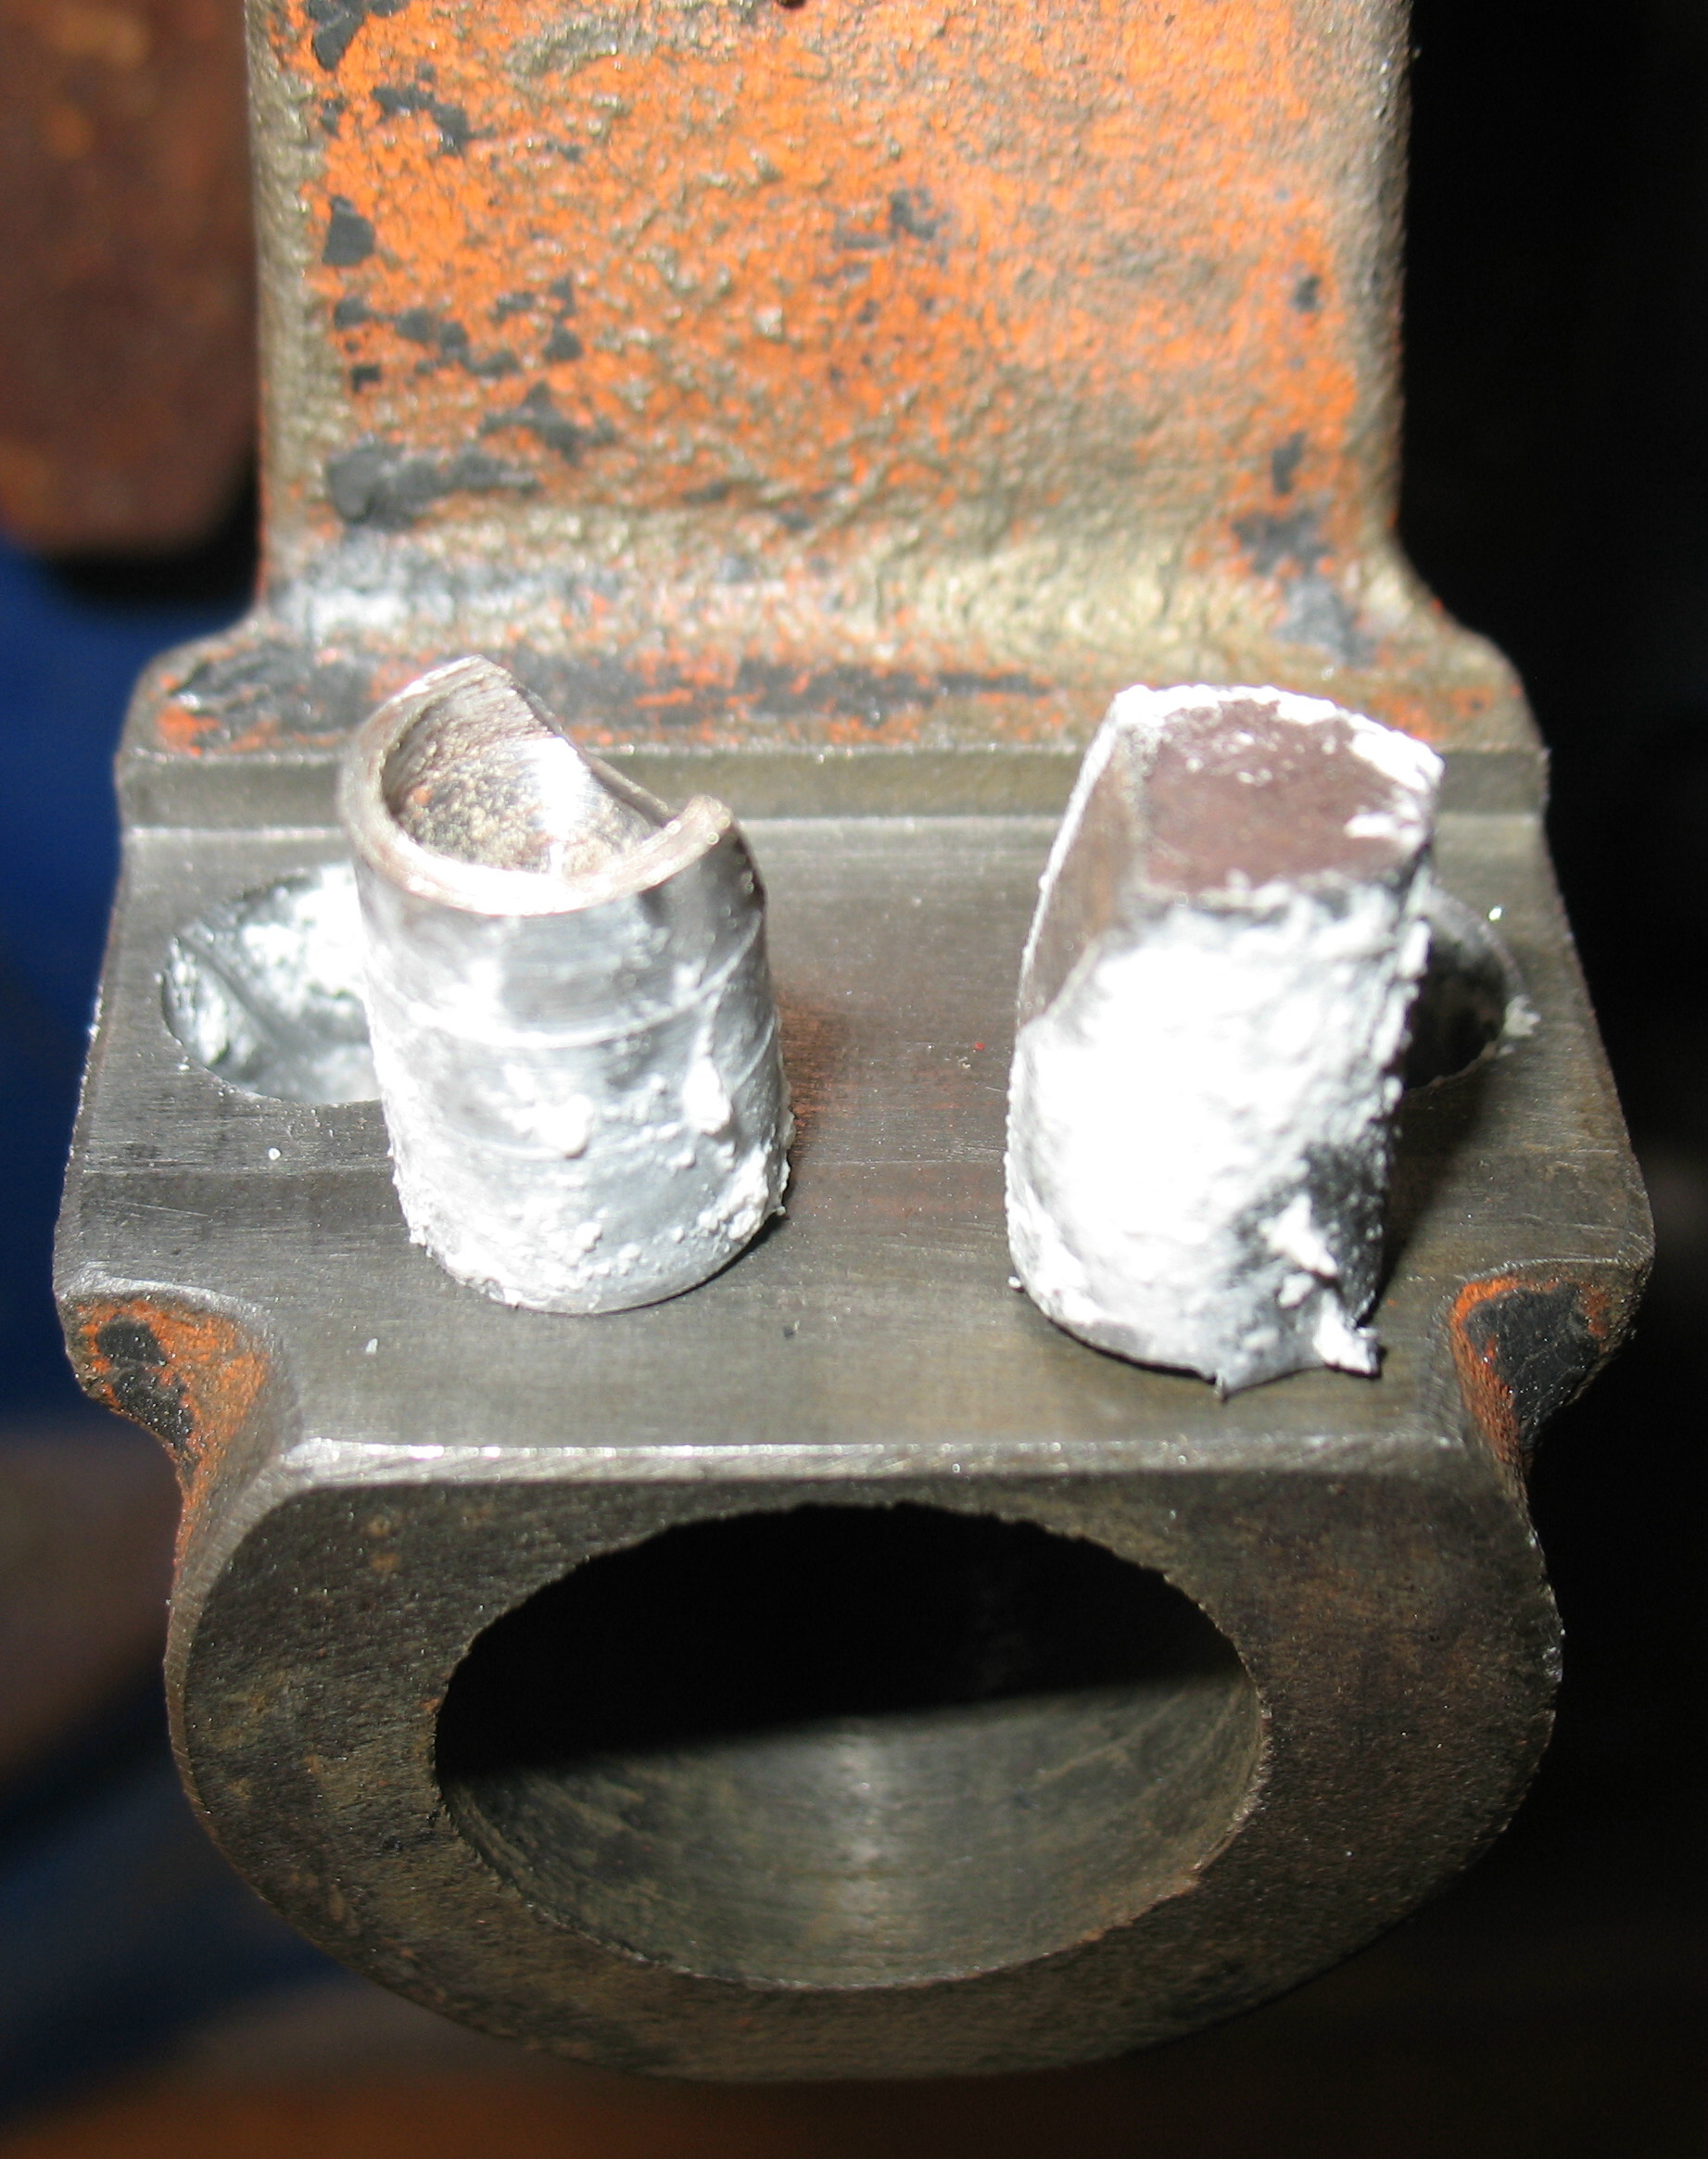
These are the plugs, coated with flux and ready to install. A corner was taken off each plug so they would not interfere with the large hole visible at the bottom of the photo.

Plugs in place

The plugs have been placed in their holes and are ready for brazing.

Brazing complete

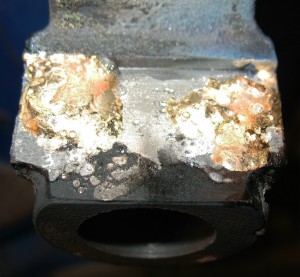
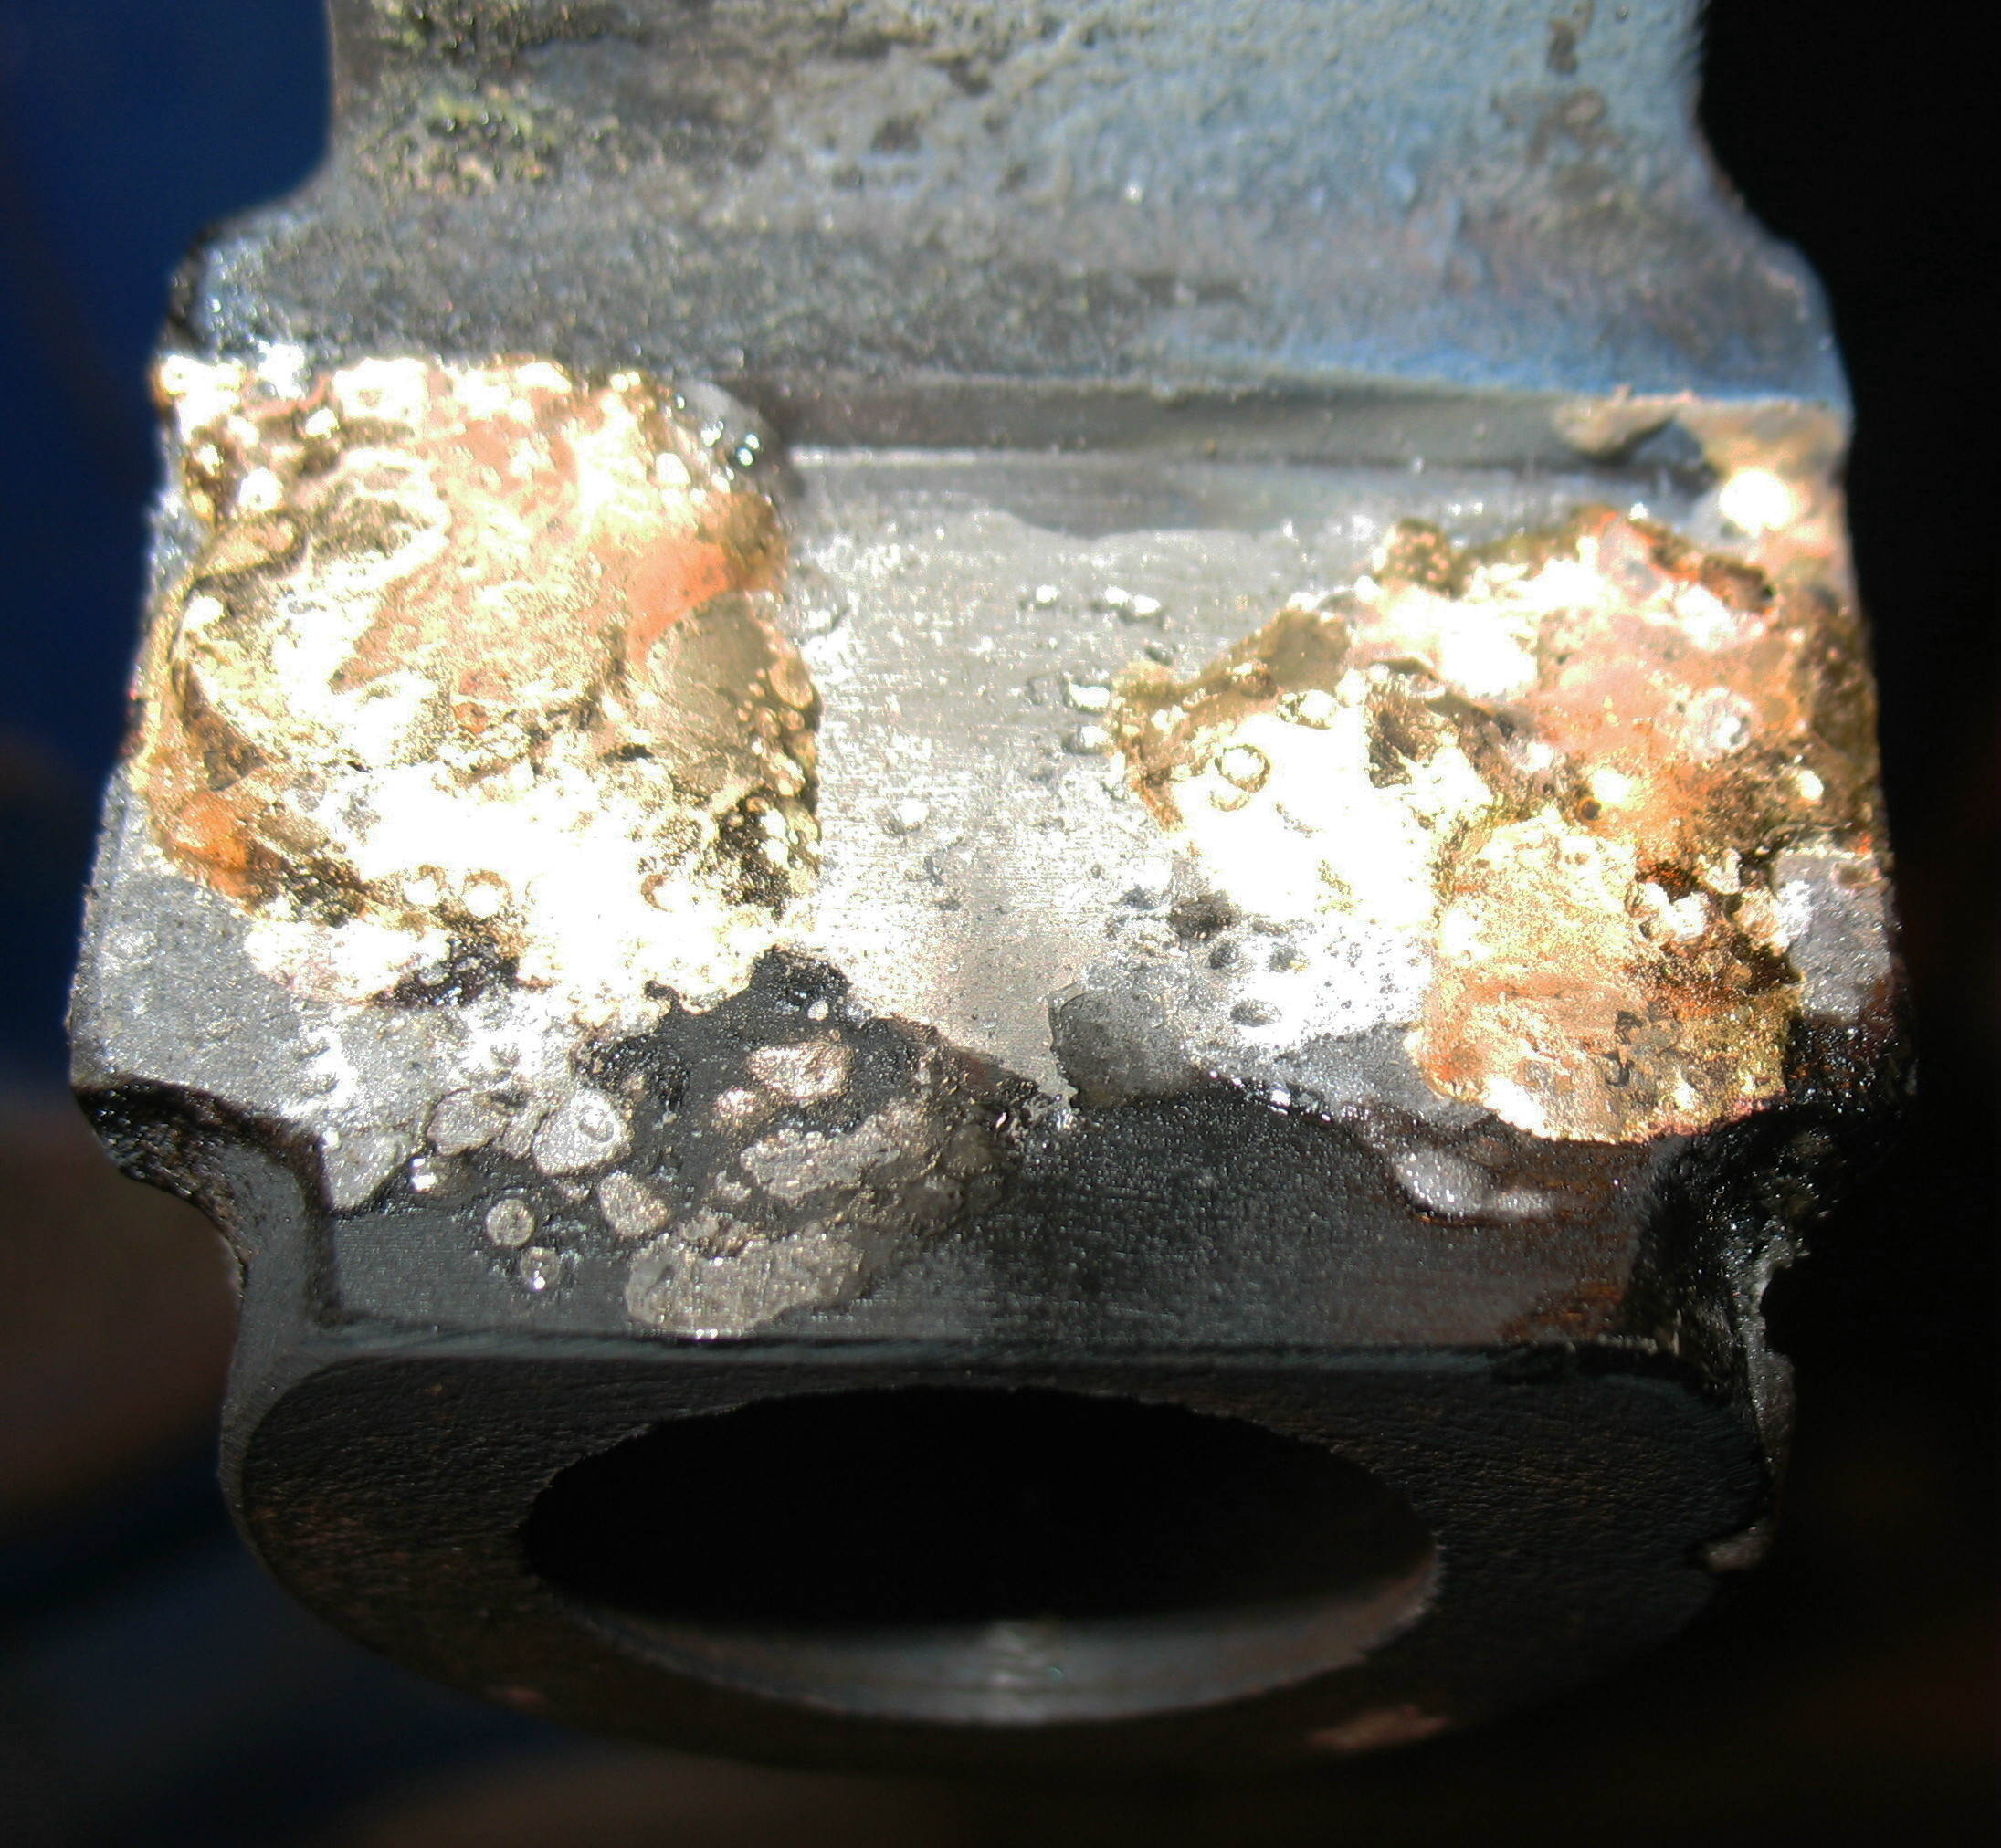
The plugs have been brazed in place. The photo is a bit overexposed due to glare so the brazing looks whiter than it really is.

The rough removal of excess brazing and plugs was done with the same mill setup as for milling out the broken screws. The final cleanup was done with the mill head turned horizontal so it could reach right into the ledge.

Mill Setup

This is the mill setup for final cleanup of the brazing and plugs.

Cleanup done

The face has been cleaned up with the mill and some final finishing with a flat file.

The next steps will be to mark the proper hole locations, drill and tap them. I will have to make an extension for the drill bit and another for the tap wrench to get this done.

Monotype Pump: Lathe work completed

In my last post about the Monotype piston rod I am making to provide a lengthened pump stroke about the only work completed was the ends of the piece.

Since that time I have proceeded through the following stages:

Top Complete

What will become the top end of the rod is complete, and I have started roughing out the stem.

Stem roughed out

The workpiece has been reversed end-for-end on the lathe, and the remaining metal on the stem has been roughed out. At this point I had to quit for the night because the workpiece was so hot.

Lathe work complete

The stem has been turned to its final dimensions and the part removed from the lathe.

The next step is to drill and tap the top hole for the handle to screw into. The drilling will be done on the drill press and tapping by hand. If there is any of the nub left after drilling and tapping I will use a countersink on the drill press to remove it.

Rural Routes Studio Tour Auction

To help fund our studio tour this year, our tour group is holding monthly online auctions of items donated by the member artists. Our turn to donate an item comes up for the July auction, so we have one month to get something ready.

We are planning on making a notebook using our handmade paper and a plain leather outer cover and coarse exposed stitching. The leather will form a limp cover which can be closed around the pages to keep the book closed. The paper is quite thin: the book will have 96 pages and the textblock will only be about ¾” thick. We haven’t decided what will hold the book closed (clasp, thong, etc) but we will be trying for a somewhat rustic effect.

So far all we have actually done is selected the leather and folded the sheets and gathered them into the booklets that will ultimately be stitched in place. We still have to remember to see how the colours work in daylight because so far we have only looked at them under the fluorescent lights in our shop.

Pages and cover leather

The bundle of folded sheets ready for punching and sewing, sitting on top of the leather that will be used for the cover. Both the paper and the leather are off-white with a hint of green in them.

Marbling Workshop

We had a group of five ladies in our shop today for a marbling workshop. It was not our usual marbling course because they were mainly interested in marbling fabric, rather than learning various marbling patterns. We started out on paper anyway to get them all used to the process and to familiarize them with handling the paints and how the different colours we had interacted with each other. We also show them how to manipulate the stone pattern with a stylus and also the basic use of a marbling comb. Here’s a sampling of what was made (the papers are 8×9″):

Marbled paper Marbled paper Marbled paper

After lunch, rather than going through all the traditional patterns as we would in our normal marbling class, the ladies spent the time marbling fabric. They had plain cotton and some organza, and some of the fabric already had a print design while other pieces were plain white. They kept track of whose piece were whose by snipping corners off the pieces; each lady had a different number of clipped corners. Here’s just a small sample of the marbled fabric, still wet:

Marbled fabric Marbled fabric

Here is most of the group concentrating on their work. Those are my hands in the lower right, adding paint to a larger tray to re-marble a sheet of paper where the first marbling attempt turned out a bit drab. Perhaps a second marbled pattern will improve it…

Marbling fabric


A Wedding Guestbook

This was a project we did about 12 years ago: a guestbook for a wedding. The overall size was about 10″ wide by 8½” high. The book was finished with a title plate pasted onto the cover (not shown), done on the same paper as the interior pages.

Interior pages

The textblock is 20 sheets of 8½×11” green handmade paper made from 1st cut cotton linters with chive flowers and asparagus needles as inclusions. The sheets were folded near their ends so the resulting book would have 20 leaves (40 pages) with guard strips in the spine area. This would allow items such as photos to be pasted into the book without causing too much bulging. The pages were trimmed at head and foot for easy turning but the raw deckle edge was left on the fore edge and the guard strips.

Cover

The book was casebound with marbled paper for the cover and white bookcloth on the spine. The marbling includes the colour of the interior pages.

Endpapers

The endpapers were also marbled using a palette that included the textblock paper colour, but in a different pattern than the outside covers.

Headbands

The textblock was finished off with handsewn headbands which pick up on the main colours of the marbling.

Completed book

The completed guestbook


Wedding Invitations

Wedding Invitation

One of the jobs we occasionally do is special announcements, including wedding invitations.

This spring, we did a collaborative job with a local couple who were getting married. The bride made the paper in our shop and we did the printing.

This was pretty much her first effort at making paper and it turned out great. The pulp was unbleached abaca beaten for an hour in our Valley Beater, with a small handful of flax noils fibre added in the last few minutes of beating. The noils had enough time to be dispersed through the pulp but were not substantially beaten or cut.

We got her started on how to form the sheets, and gave her the formula for topping up the vat (one scoop of pulp from the bucket for every three sheets made), then let her go at it while I set the type for the printing. The entire page was set in Lydian Cursive 18 point.

She made 8½×11″ sheets which we then cut into three pieces about 8½×3½” with cut long edges and deckle short edges. Needless to say, this paper size left no room for verbosity.

A few days later I did the printing on our C&P press and applied thermography powder to give the ink gloss and thickness.

The test print I made with black ink looked pretty good, but they opted for cocoa brown instead. When seen right off the press I don’t think they looked as good as with the black ink, but once the thermography was done the resulting glossy brown ink turned out to be a great match for the paper.

All in all it went well for both of us, since she found the papermaking very relaxing, and she was there to consult with regarding wording, spelling, and layout as I set the type.

Monotype Parts Stock

As part of fitting the pump latch mechanism onto my Monotype caster, there are a couple of missing parts that I might have to make. Making them should be easy since they are geometrically very simple, but I would have to do some estimating on some of the dimensions. Before going down that road I thought I should check my stock of parts to see if some previously unrecognized part turned out to be one of the ones I need.

I keep my parts stock in wooden crates I made special for the purpose from 7/16″ chipboard, and I keep them stacked on a pallet. The bottom of each crate is set into a dado in the sides so heavy loads won’t cave them in. There are two crate sizes, one exactly twice the height of the other.

Parts bins (front) Parts bins (rear)

The parts are roughly organized based on the functional group of the machine, and also on size so I don’t have a deep crate containing a big heavy casting along with a few small parts rattling around in the bottom. Sufficiently small parts are put in cardboard boxes and labelled on the box. Here are some sample bin contents:

Pump parts

This is the bin labelled “Pump & support & lift mechanism” and most of the parts appear to be the pump support mechanism, although you can also see some pump parts (a hat valve and an American-style piston)

Pump Operating Linkage

This is the “pump operating mechanism” bin. This contains several lower crossblocks, some parts for the levers that actually move the pump piston, and linkage parts all the way back to the catch that enables or disables pump operation. There are also a couple of release mechanisms for the pump latch.

Tools

This is the “Tools” bin which contains an assortment of Monotype (and other brand) tools for working on the caster. Some of the smaller tools in in the boxes labelled with their part numbers.

Unfortunately I did not find either of the parts I was looking for, but I did stumble across some parts in the “unknown” bin that turned out to be the eye at the bottom of the piston spring rod (a20H2).

That’s just a sampling of the bin contents, so if you’re looking for a part check with me. I might just have one (possibly brand new) in one of these bins. I even have some keyboard and Giant Caster parts even though I own neither.

Cleaning the Thompson ink fountain (Part 2)

After spending a few hours across several evenings, I have the ink fountain from our Thompson press cleaned off and fully disassembled.

Paint stripper applied

It took several treatments with the paint stripper to get everything clean. There was no way to distinguish dried ink from paint so I stripped everything clean and will repaint.

The adjustment screws eventually came out after the paint stripper had softened the ink on them and they now operate fairly smoothly, considering that I have not oiled them (I want to avoid oil until I have repainted the parts).

Ink Fountain Parts—All Clean

My next step will be to repaint the parts. Only the lid and part of the main body are painted; the rest is bare metal protected from rust by a film of oil. The rest of the press seems to be finished with a semi-gloss black so I will be using that as well. I will probably also use some contrasting paint to bring out the raised lettering on the lid.

Thompson Press in motion

This post is a bit of a cheat; I currently can’t upload still photos (WordPress is not generating the reduced-size versions of the images), so I’m basing today’s post on a video.

After getting my Thompson press in January, we had finally moved it close enough to the 220V outlet that I could plug it in and spin it up. Later that day I had it feeding paper and printing, but, silly me, I only took video of the press moving with no paper, no forme, and no ink. So here’s that video:

The first part of the video just shows the overall motion of the parts. The second part shows the feed mechanism: a sucker arm lifts a sheet off the feed table (to the left in the video) and draws it down onto the platen. The third part shows the delivery: a gripper arm grabs the edge of the paper and pulls it sideways, laying it down onto the delivery table where a puff of air from a nozzle flattens down the sheet. By the way, the video shows the press running at its lowest speed.

Top