A Little Printing Job

Last October I was printing some “Save the Date” cards for a customer, and decided to take a video of the work.

It only too me 8 months to edit the clips into a single video, but, after much delay, here is the result.

I’m using our 7×11 Chandler & Price Old Style press, fitted with composition ink rollers, to print cocoa brown oil-based ink onto 5×7 handmade sheets. The paper is mostly abaca pulp with a bit of cotton, and some chive flowers for decoration.

The deckle edges of the paper make for slow placement of the sheet against the gauge pins; you can’t just drop it against the two bottom pins and slide it until it hits the side pin because the deckle edge will not slide against the pins well. As a result I’m running the press very slow, maybe 600 impressions per hour. I hadn’t run the press for a while and it took me some time to get my rhythm on the treadle to avoid stalling with the treadle down while loading the sheet. When this happens I have to give the flywheel a push to get things moving again.


CBBAG Ottawa Book Arts Fair, Saturday May 14th

I should have posted this a lot sooner, but if you miss us this year at the Grimsby Wayzgoose, we will also be at the Book Arts Show & Sale on May 14th, 2016, organized by the Ottawa Valley chapter of CBBAG. The show is at the Glebe Community Centre, 175 Third Avenue, Ottawa, and runs from 10am to 4pm. Best of all, admission is free!

Now I know…

…why the Monotype manuals say not to raise or lower the pot unless it is molten. They never explained why this could cause any problems, and the pump piston linkage is jointed enough to follow the pot up and down with no trouble, so I never gave this much heed.

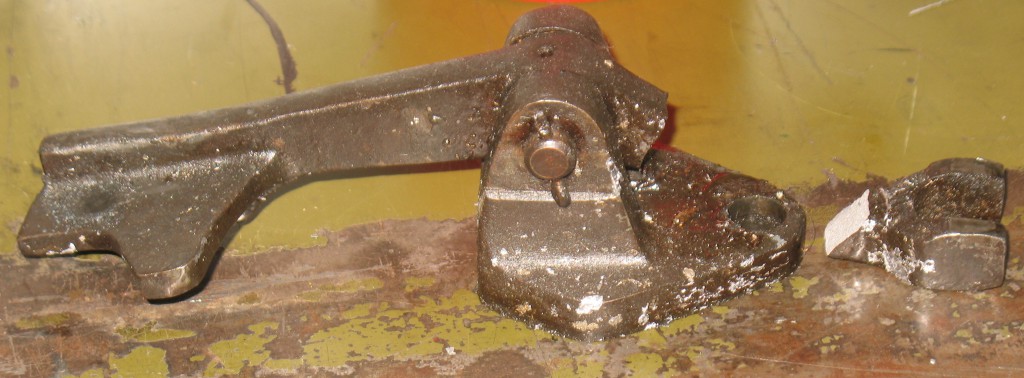
It turns out not to be the pump piston linkage that is the problem, but the pump lowering lever. If the metal hardens when the pot is not fully up in its operating position, the pump will be frozen in the metal in a raised position. If you then crank the pot up to operating position without fusing the metal first, the lever that lowers the pump away from the mould will break.

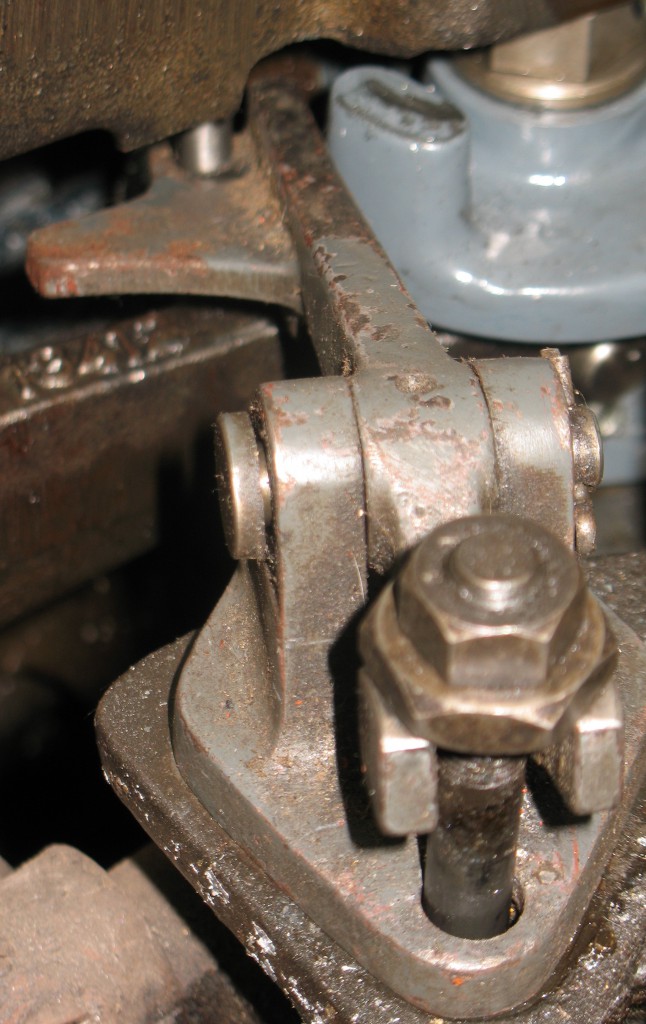
The pump body lowering lever. The far end is pressed down by the shiny rod, lifting the nut in the foreground, thus lowering the pot. When the rod lifts, a spring pulls the pump up. Normally this happens as the machine is about to fill the mould, but this also happens if you lower the pot.

The pump body lowering lever. The far end is pressed down by the shiny rod, lifting the nut in the foreground, thus lowering the pot. When the rod lifts, a spring pulls the pump up. Normally this happens as the machine is about to fill the mould, but this also happens if you lower the pot.

If you raise a solid pot, the rod will push down, but the pump can't move so the nut can't move up, and this lever breaks instead

If you raise a solid pot, the rod will push down, but the pump can’t move so the nut can’t move up, and this lever breaks instead

Fortunately I have some spares of this lever. Also fortunately, this lever breaks rather than the ones that actually support the pump body; there are two of these and they are much more trouble to replace.

Because the pot is so heavy, the crank to raise it has a large mechanical advantage, so the force required to break this lever isn’t even noticeable.

Although this happened to me with a pot that solidified in a lowered position, it is also possible for this to happen if you raise a pot the had hardened in the raised position and has since been lowered. This might occur if, for instance, you have adjusted or replaced parts of the pump body lowering linkage.

I’ve learned my lesson, and now that I know why raising a cold pot is a problem, I should remember never to do it. It still seems, though, that lowering a cold pot is OK.

Making my mill more rigid

In my shop, I have a Sherline mill. Normally I have it set up like a model 5000 series, with a solid column, for rigidity and to reduce the number of adjustments that can go out of whack.

Recently I have been working on a project that needed a deeper throat on the mill so it could reach across a larger workpiece. To do this I changed the mill column to the model 2000 style (which is how I originally purchased the mill). Although this setup gives more reach to the mill, it has four additional setup adjustments which have to be set properly. Under even moderate milling loads I have found that these settings drift as the work proceeds, which is why I generally use the rigid single-piece column.

This job would have light milling loads so this drift would not be of concern.
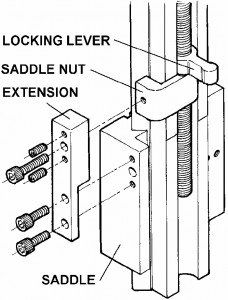
Mill Saddle Travel Extension

from the Sherline instructions for the P/N 5650 Mill Column Upgrade

However, this job would also be using a very small endmill held in a collet in the mill spindle, requiring that the mill head be able to drop very low to reach the work. The lower limit of the mill head occurs when the Z saddle nut contacts the mill column. Sherline has a modification (the Saddle Travel Extension, P/N 40176) for the Z motion nut to permit the head to move lower by raising the nut relative to the milling head. The extension is a bar that mounts on the original saddle nut mounting holes, and provides new higher holes for attaching the saddle nut.

I have in the past found that this modification has too much flexibility to provide reliable Z depth control, and this time I actually measured the effect. As I manually turned the Z handwheel I could see the extension arm flexing. The step in the extension arm does not rest on the top of the saddle, so there is a short portion of the arm that is only about ½×¼″ in cross section where the flexing occurs. Between this flexing and the clearance between the saddle nut and the threads on the lead screw the total Z backlash was about 0.035″—almost a millimetre. Furthermore, the springiness of this arm made the Z motion chattery, jumping about 2 thousandths of an inch at a time.

I resolved to cure this finally, since the current job required better Z depth control than this could provide.
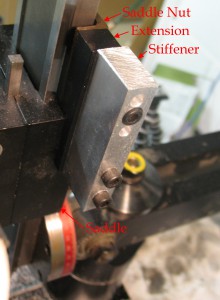
IMG_9263 AnnotatedI found a piece of ½×1″ aluminum bar from my scrap stock, cut it to the same length as the existing extension arm, and drilled five holes in it to line up with the holes in the extension arm. The hole for the screw that attaches to the saddle nut was counterbored ⅛″ to allow sufficient thread engagement with the saddle nut. I removed the three existing screws in the extension, placed my new part against it, and used some new 1½″ screws to attach it.

With this modification installed, the Z backlash has been reduced to 0.011″ and the Z motion is smooth. This is still a lot of backlash, but this saddle nut (unlike the X and Y motions) does not include a provision for reducing the clearance between the nut and screw. Because there is no chatter in the motion, I can modify the CNC code to account for the remaining backlash.

Updated Information on New Type

We have updated our page describing the new type we offer to include some details on characteristics and typical pricing.

Out of stock: Sisal fibre

It took several years, but our stock of sisal fibre is now sold out. We will be looking for someplace willing to sell it to us in single bale quantities, but for now this product is out of stock.

Please note that we still have sisal pulp in sheet form available.

Grimsby Wayzgoose

The Grimsby Public Library and Art Gallery will be holding their 38th annual Wayzgoose on April 30th, from 9am to 5pm. This gathering of book artists will take place at the Gallery and Library, including the adjacent Carnegie Commons building (the original library), in Grimsby Ontario.

As for the past 18 or so years, the Papertrail will have a table there, selling handmade and marbled paper, bookbinding, papermaking, and marbling supplies, along with new and used books relating to the various book arts.

We will also accept orders in advance for pickup at the fair; please place your orders by Wednesday, April 27th to ensure we can have everything ready. If you want to purchase new type for letterpress, please note that we will charge $5/font for Wayzgoose pickup (there are no shipping charges on other products) and that orders for type will be filled based on available time. We will process orders for type in the order received, so you should order as soon as possible, and no later than April 22nd.

More information including directions to this event are available at their web page.

New type for letterpress now available

We have posted a list of the faces and sizes we have available for casting in our Products section.

An Unusual Monotype Mould

I found an unusual Lanston Monotype 30pt display mould (for the Composition caster and Type and Rule caster) at my last visit to Don Black’s.

What intrigued me was that the top of the blade appeared to be split into two sections. I thought it might be for doing something like casting from composition matrices onto large-body type. Without actually knowing what it was I bought it because such oddball things intrigue me.

Unlike most Lanston display moulds, this one did not have the “scissors,” a pair of levers which transfer spring pressure to either keep the top blade moving with the main blade (for casting type and high quads) or to keep the top blade closed (for casting low quads). There was not even provision in the mould body for the scissors and their pivot. There also appeared to be no other provision for independently controlling a two-part blade.

The mould was stiff with aged lubricant but I managed to pull the blade open. Once I saw the open cavity I realized that what I had was a mould for making cored type, that is, type with a deliberate hollow in the middle to make the formes a bit lighter to handle.

The Lanston Monotype moulds can be refitted with kits for casting various sizes of type, although the kits are custom-fitted to the mould and must match by serial number. This is what the usual blade kit looks like:

1 - Standard Blade KitHere are the corresponding parts for the cored-type blade:

2 - Cored Blade KitA tang near the rear of the right blade engages in the left blade so the two always move in unison. The core nestles into the recess in the right blade. The blade stop is a simple rectangle (rather than the duck-head shape of normal blade stops) because it does not have to provide a stop for any upper blade. The thickness of the core plus the two point blocks determine the point size of the type.

This shows the assembled blade and core:

3 - Cored Blade AssembledFinally, when the blade in installed in the mould and retracted (with crossblock removed as well), this is what you see:4 - Cored Blade InstalledThe end of the core come just a little short of the ends of the left and right type blocks, so the cavity in the type would probably not quite go all the way through. The slot between the two halves of the blade allow oil to lubricate the contact between the core and the blade halves. This particular mould does not appear to be that heavily used, but based on the condition of the screw heads it does look like it was disassembled often so during its service life it may have been a bit of a troublemaker!


New Dryer Felt

We have been unable to obtain any more of the dryer felt we used to sell for use in paper drying stacks.

We have a replacement material which is also spin-bonded polyester, but it has only about half the weight per unit area compared to our old felt. On the other hand it has a much higher loft: its uncompressed thickness is about 2cm (¾″).

IMG_9097 IMG_9098

If you clamp your drying stack tight enough this will flatten out like the old felt did, but by leaving the clamps or straps a bit looser, this felt will remain open, thus allowing more air circulation closer to the paper. The higher loft also means that the ridge pattern on the corrugated dryer boards will be less likely to transfer to the dried paper.

One downside is that the higher loft makes for bulkier parcels and higher shipping costs on orders.

Finally, the new felt is 90″ (229cm) wide, giving a little more versatility for cutting to size than the old 60″-wide felt. We sell it in cut lengths at $4.90 per linear metre.

Top