The Sigwalt press we recently bought was dirty, the paint was chipped and worn thin in places, and there were a few spots of rust as well. It also had no roller trucks and the gripper spring was bent out of shape.
The roller trucks were easy to make on the lathe from round steel stock. They are ¾″ diameter (to match the rollers) and have a ¼″ centre hole. They are just a little under ½″ thick, to use up the space between the saddles and the ends of the covering.
Rather than just clean this press superficially, I took it (almost) completely apart and refinished it. There was no fancy detailing to worry about covering or duplicating so it was just a matter of cleaning and painting the parts. Disassembly was fairly easy: most of the parts are held together by ¼″ rods which can be easily tapped out with a small hammer and pin punch. All but one of the rods have a chisel gash near one end; the burr gives the rod enough grip in its hole to keep it in place when the press is used. One exception is the gripper rod, which is held captive by the gripper cam being trapped between two bumps on the platen frame. A pin holds the gripper cam to its rod.
There were also four retainer rings to remove. These were just heavy wire formed into a small hoop which is crimped into a groove on the rod. I used a screwdriver to pry them open enough to slide them off the end of their shafts.
This press uses a rubber disc to provide some tension to hold the bed in place against the impression screws. The old disc was hard as rock, but I found a rubber bumper that was ⅜″ thick and 1″ diameter to replace it.
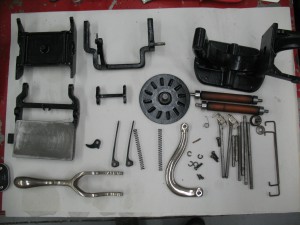
Everything except the grippers (which are brass) and the two nickel-plated parts went into a degreasing bath, following by a rust-removing bath. There were two small casting flaws which had been filled (probably at the factory) but the filler came off as I cleaned the parts. I refilled these with some “steel” epoxy putty. I blended some gloss black rust paint with a bit of matte to cut the shine a little, and repainted all the cast parts. That got me to this stage, pretty much ready for reassembly.

Pretty much ready to reassemble. What’s not disassembled? The newly-made trucks are on the form rollers, the pin that drives the form roller yoke is still in place, and so is the pawl that rotates the ink plate, along with its pin and spring. The gripper spring (just below the left end of the form rollers) still needs to be bent back into shape.
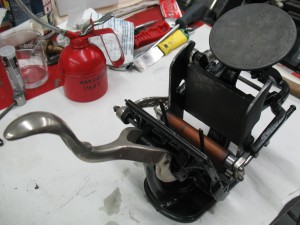
Once the spring was re-shaped, everything was ready to reassemble. The first time I put in the gripper pawl and shaft I had forgotten the grippers themselves, so I had to take that apart a bit to get the grippers on. Other than that, things went together as easily as they came apart. One of the rods wasn’t holding in place well enough, so I struck its gash again with a chisel to raise the burr a bit. The retaining rings could easily be crimped back into place by squeezing them with pliers.
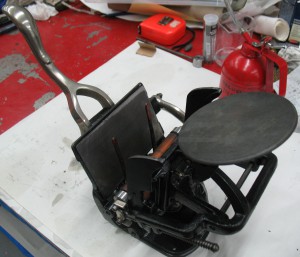
With everything together and well oiled, but still no chase, here’s the result.
I will be making a chase from some ⅜×⅝″ cold-rolled steel. The little wedges on the sides which catch on bumps inside the rails on either side of the bed will probably have to be hand-tuned to hold the chase in the right position on the bed.


Hello, looking for replacement rollers for mine. Any info would be appreciated. thank you, Bill
Bill,
The rollers on my press are smooth and clean but very hard so some time in the future I plan on trying to cast new ones from polyurethane rubber.
I still have to get a mould of the correct diameter to do this, and the project will be pretty experimental for me so I don’t know how it will turn out.
Even once I have all the parts I need, my timing will be driven by the weather. The resin I have really wants warm dry conditions, but it is pretty nasty stuff so outdoors would be best for ventilation. But winter is coming so a warm and dry outdoor day may be quite a while in coming!